Part 2: Your First Sketch
Naked-eye astronomy sketching with a pencil and paper
This is Part 2 of my series, A Step-by-Step Guide to Astronomy Eyepiece Sketching. If you missed the first part, you can read it here: Part 1: Introduction to Sketching.
Hello everyone! In this part we will make our first astronomy sketch.
All you need is a pencil, a sheet of paper and a clear night sky. For your first attempt, choose a clear, moonless night, or a night when the Moon is a thin crescent that sets early and leaves the sky dark. If you live in a city, don’t worry. You can still begin with the brighter stars and constellations visible from your location.
Tools Required
-
A sheet of white paper, or a sketching template. You can download and print the attached templates.
-
An HB pencil and an eraser.
-
A dim red-light torch, if available, so you can see your paper without using a bright white light.
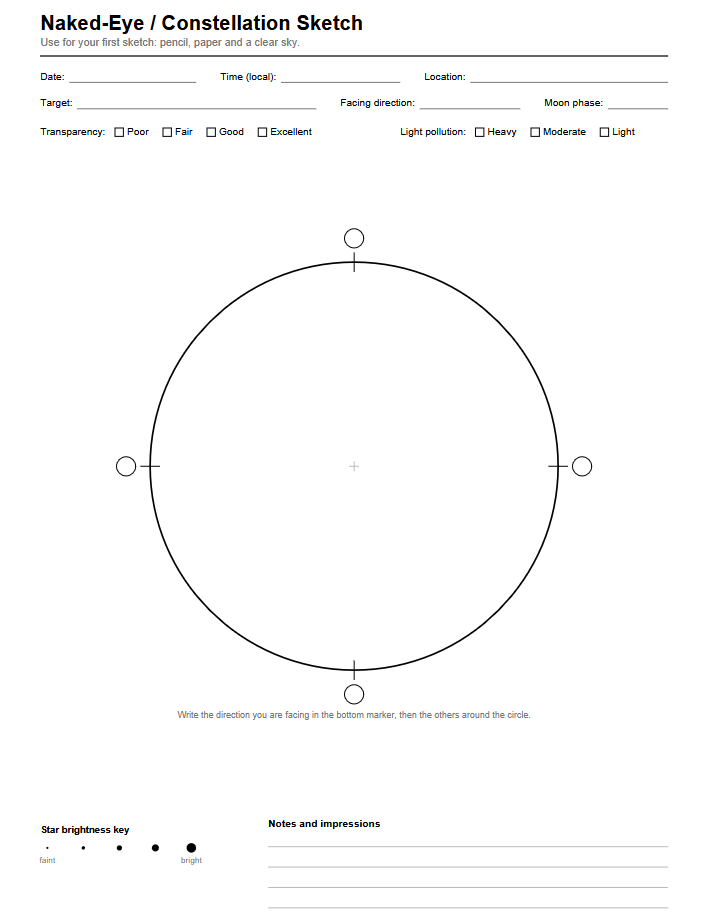
A star map, or a smartphone with a sky map app such as Stellarium or Sky Tonight, to identify constellations. Use the night mode in the app.
Step 1: Prepare Your Paper
Draw a large circle on your paper to represent the sky. This is your observing field. You can also use the attached sketching template.
-
Mark the cardinal points: N, E, S and W.
-
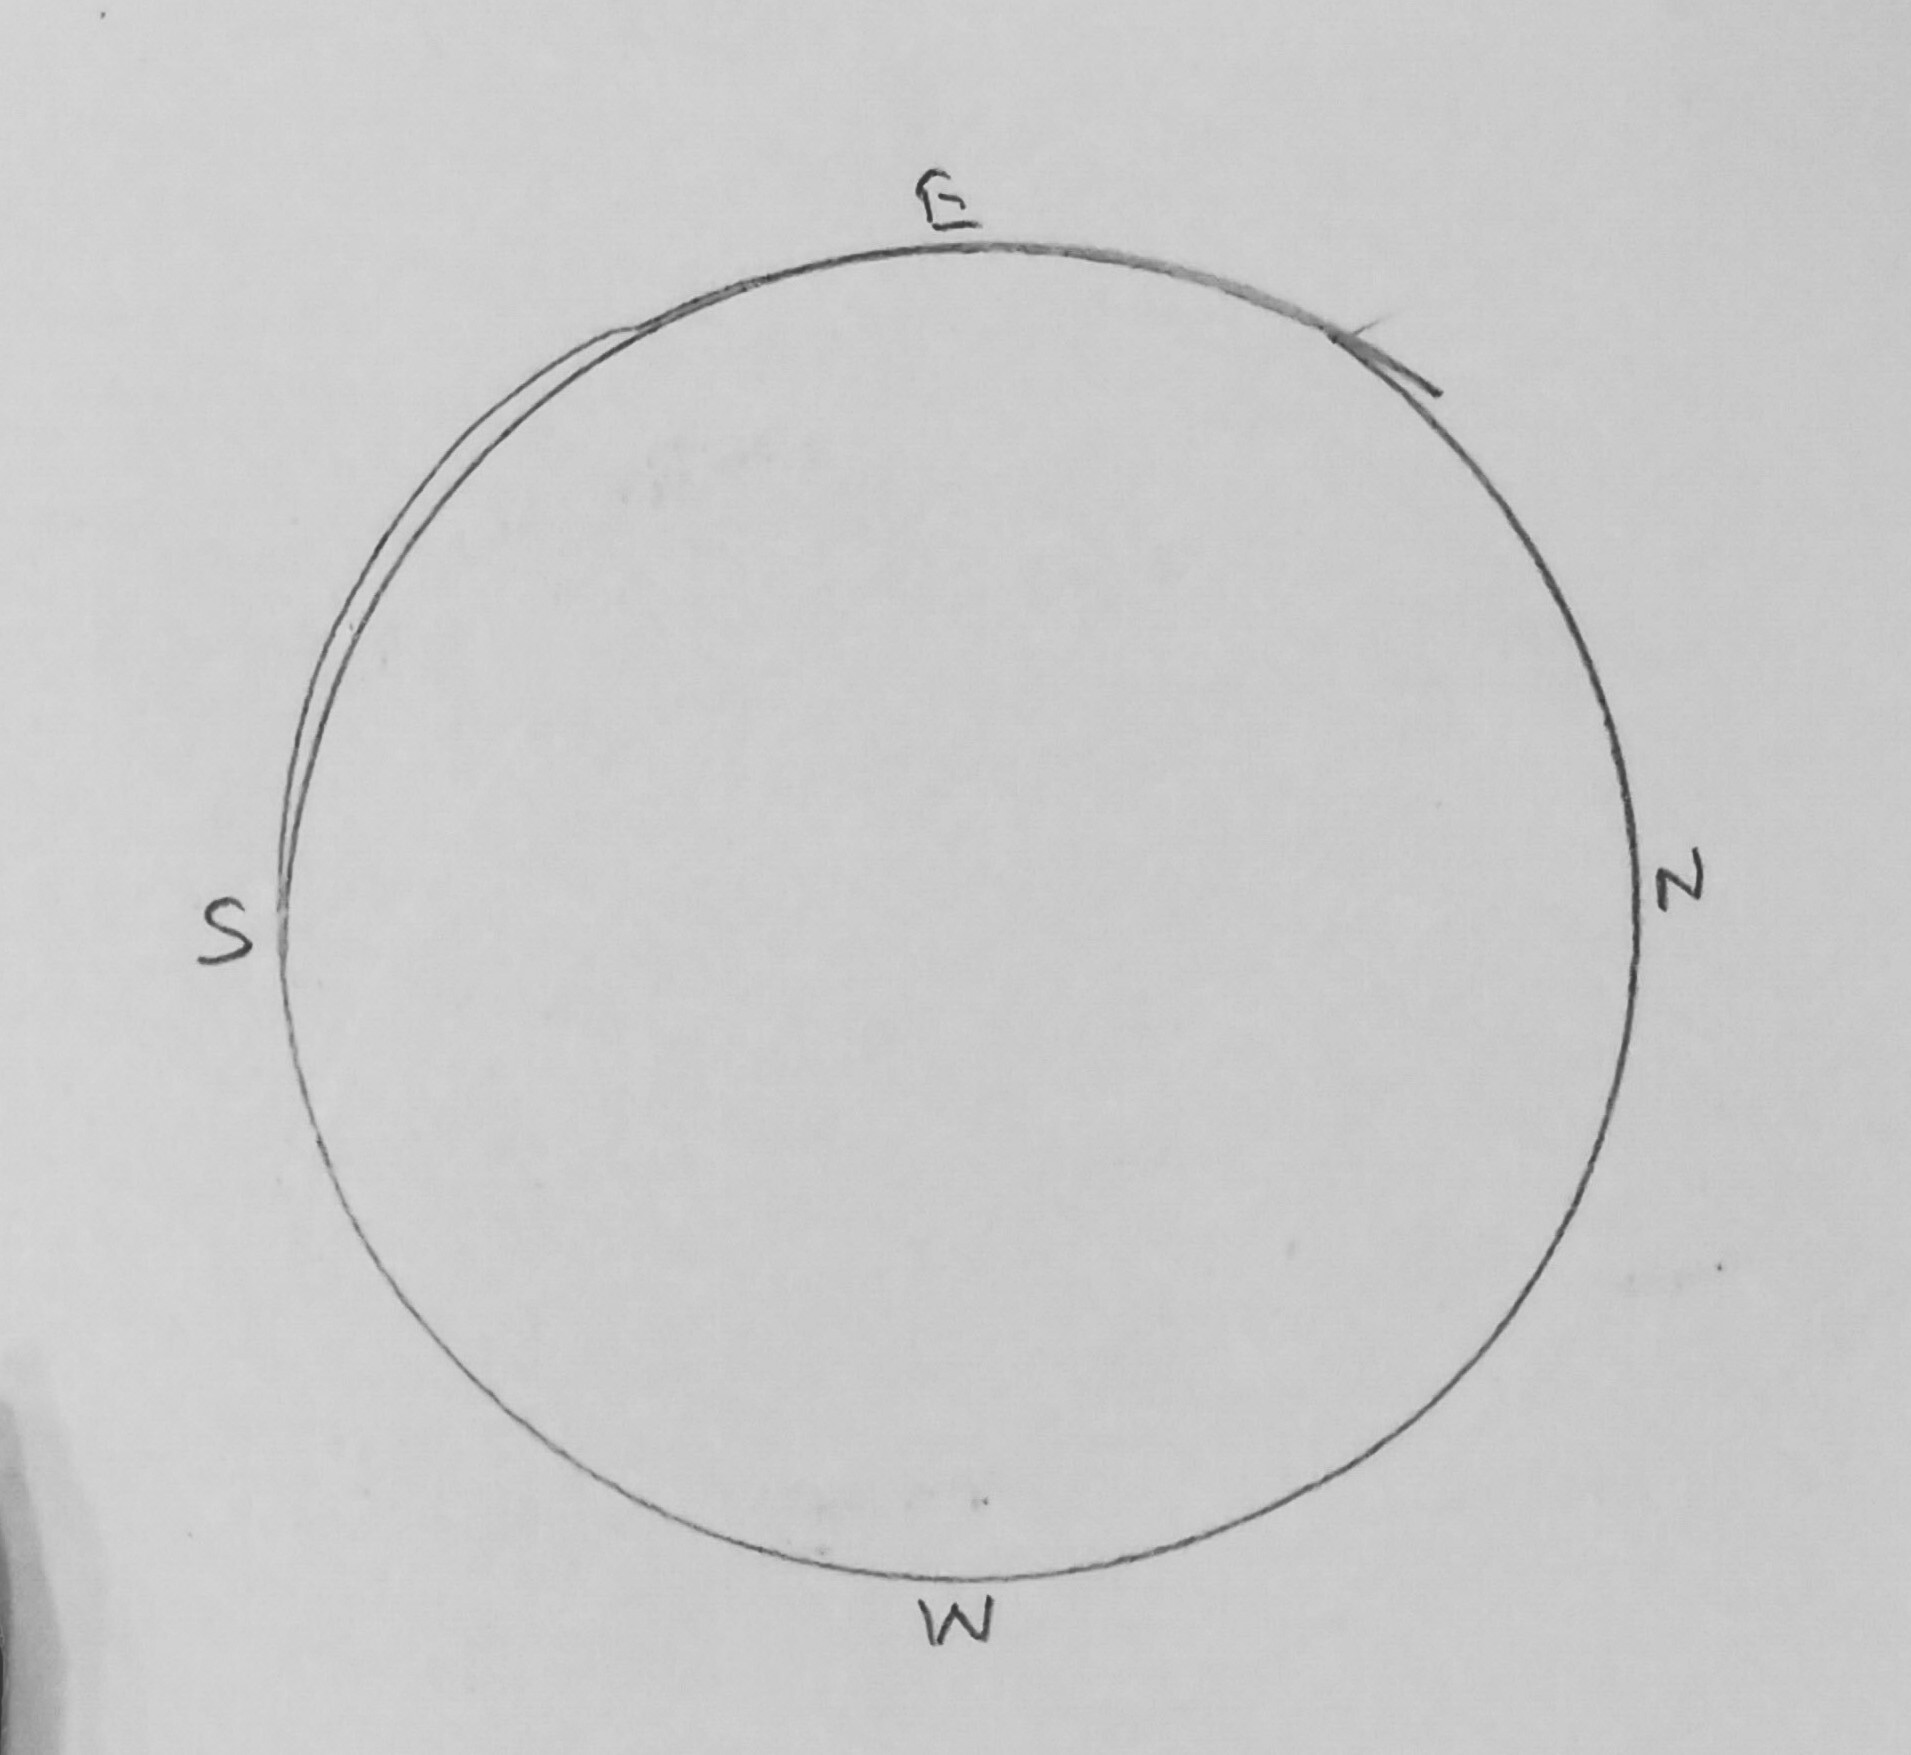
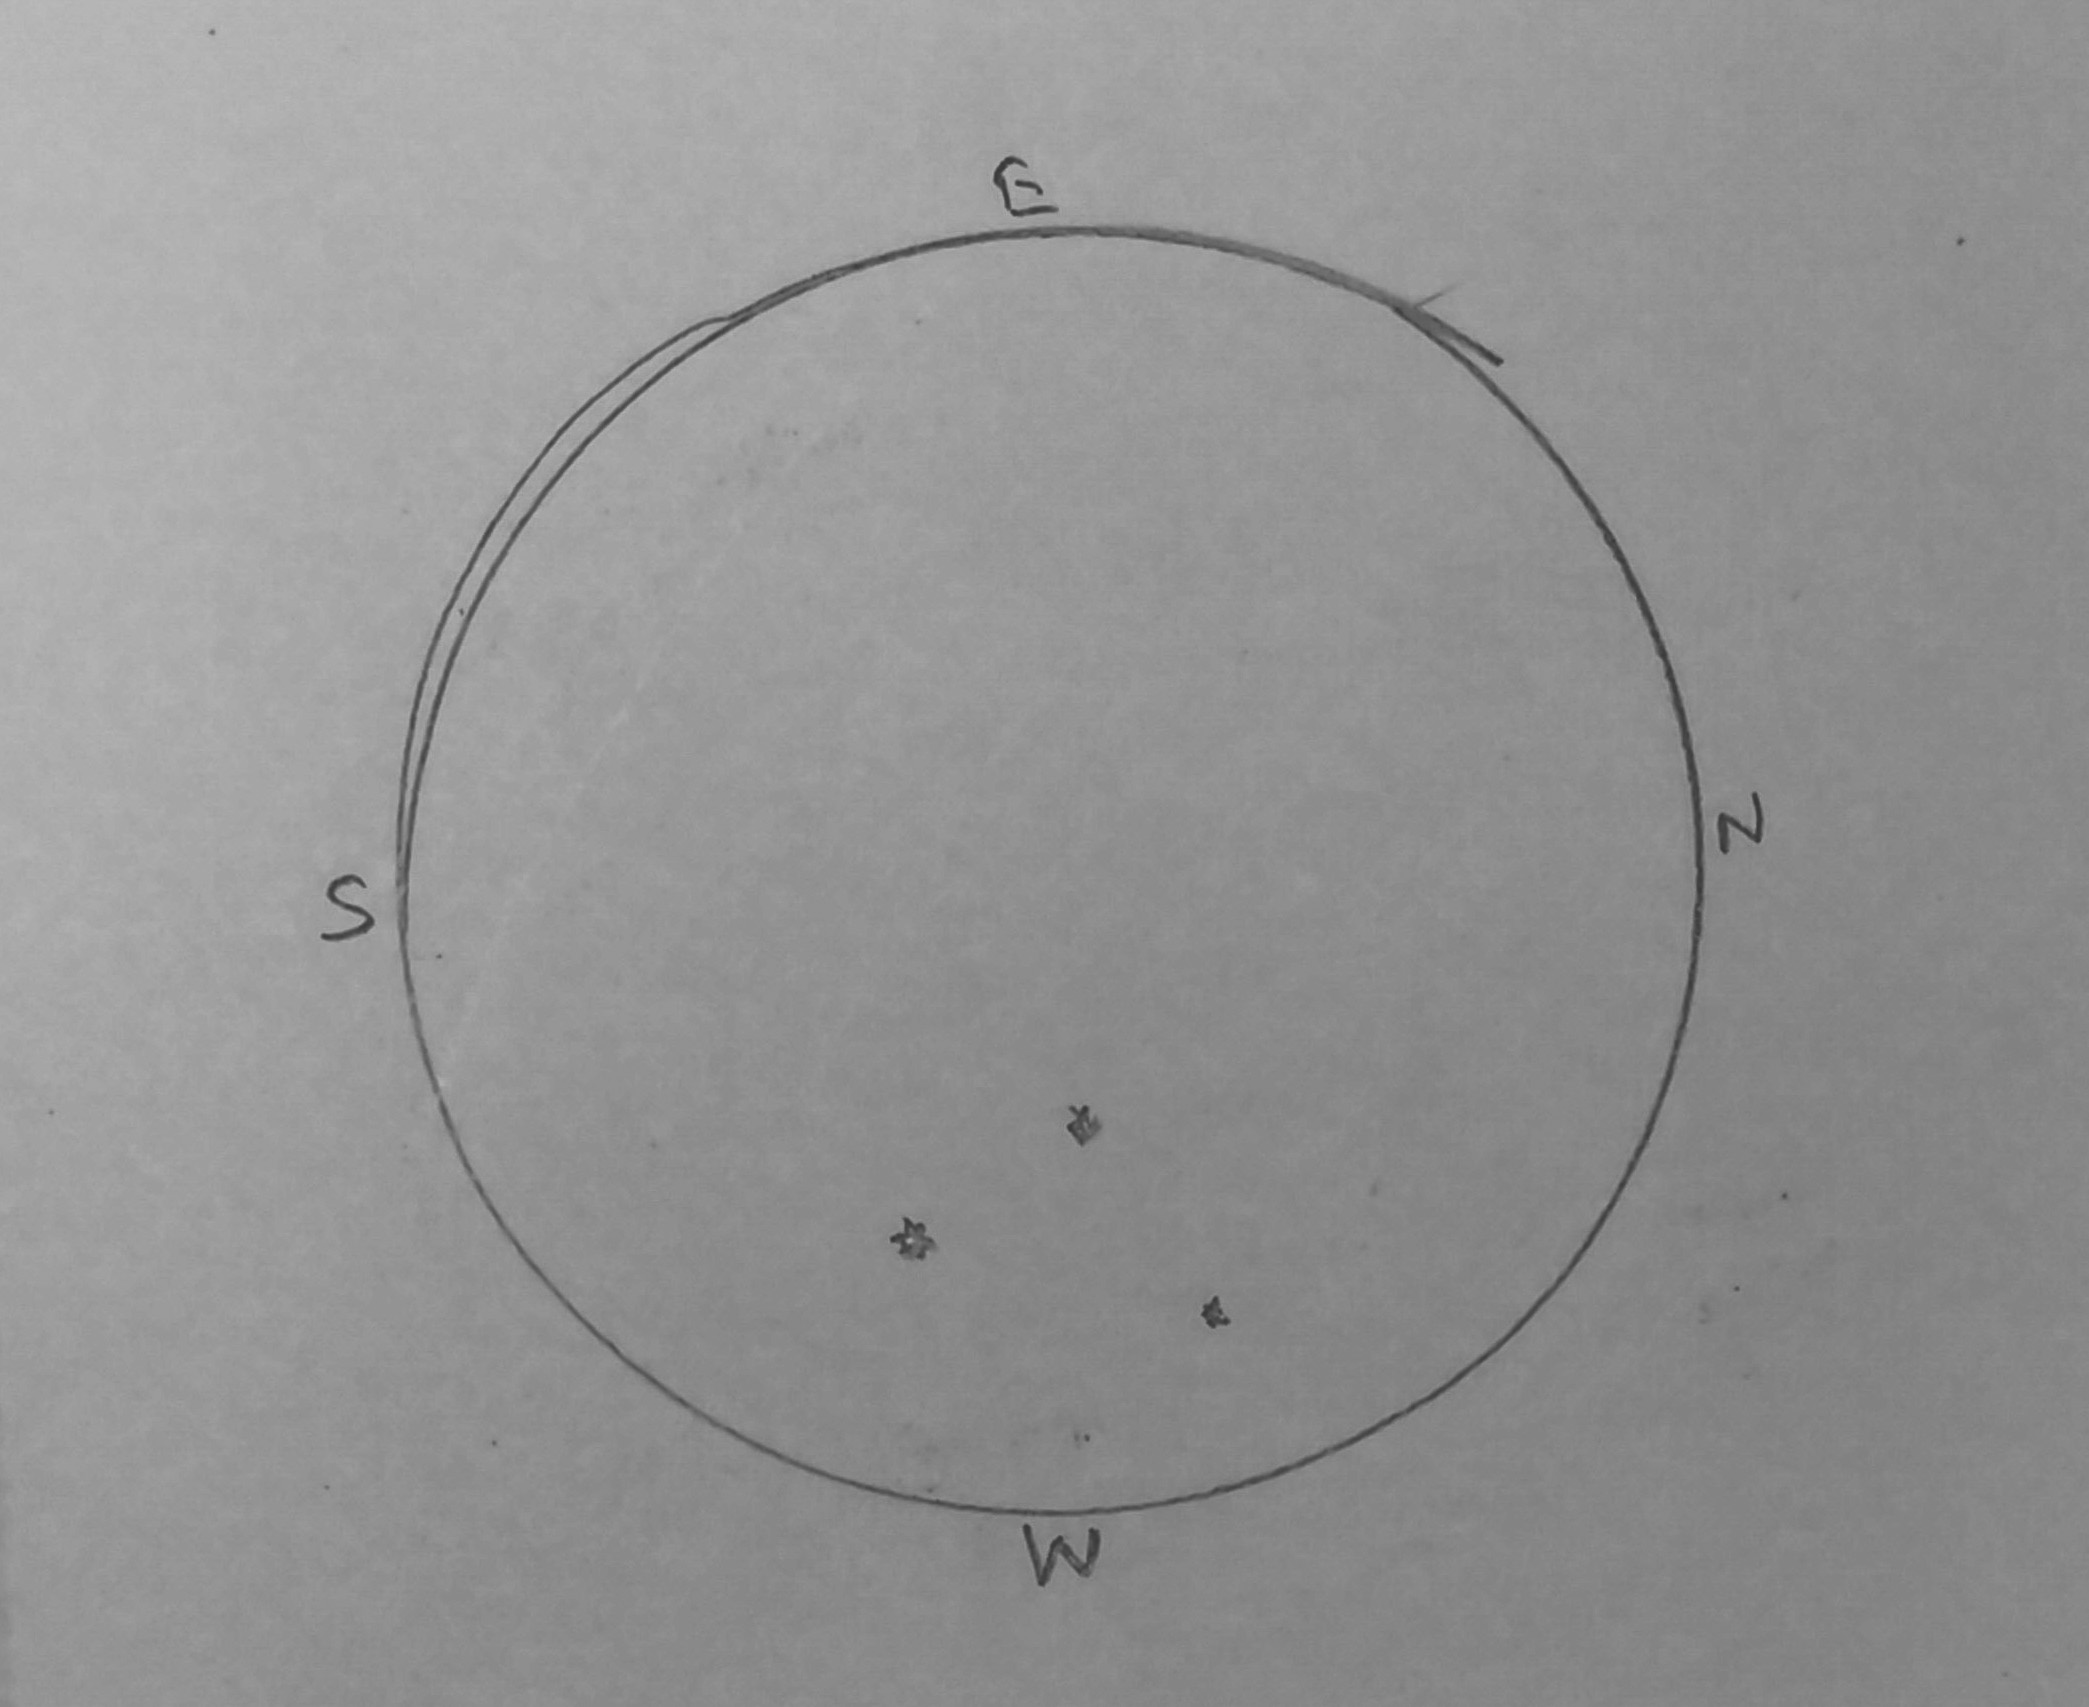
Mark the direction you are facing at the bottom of the circle, and the other directions accordingly. For example, if you are facing west and looking up at the sky, write W at the bottom of the circle and place the rest around it. See the image of how I marked mine while facing west.
-
Write down the date, time and locationat the top or bottom of the page.
Step 2: Choose Your First Target
- Begin with something easy to recognise rather than trying to draw the entire sky.
- Choose a prominent constellation, a bright star, a small group of bright stars, or a distinctive star pattern, depending on the season and your location.
- If you live in a brightly lit city, concentrate on the brightest stars first. You can add fainter stars later if your eyes can pick them out.
Step 3: Observe Before You Draw
Remember the 80:20 rule: observe 80% of the time and draw 20%. Spend a few minutes looking at the star pattern before you make any marks. Your smartphone can help you identify stars and check constellation names.
Notice:
- The number of bright stars you can identify
- The constellation you recognise
- The distances between neighbouring stars
- Which stars appear brighter or fainter
- Any nearby stars that help you recognise the pattern
Step 4: Plot the Brightest Stars First
Begin by placing small dots on your paper for the brightest stars. Use slightly larger dots for brighter stars and smaller dots for fainter ones. Keep the spacing between the dots proportional to what you see in the sky.
Make small corrections as needed. It is perfectly normal for your first sketch to need several adjustments.
Then look up from your paper and compare your drawing with the real sky. Ask yourself:
- Are the stars in the correct relative positions?
- Have I made the brightest stars stand out?
- Have I included only the stars I can actually see?
Step 5: Observation Notes
Observation notes record what you see, identify the objects you recognise, and help you track your progress as an observer.
Record star names on your sketch
You do not need to memorise hundreds of star names to enjoy astronomical sketching. Begin with a few recognisable constellations and their brightest stars. As you repeat your observations, the names and patterns will gradually become familiar.
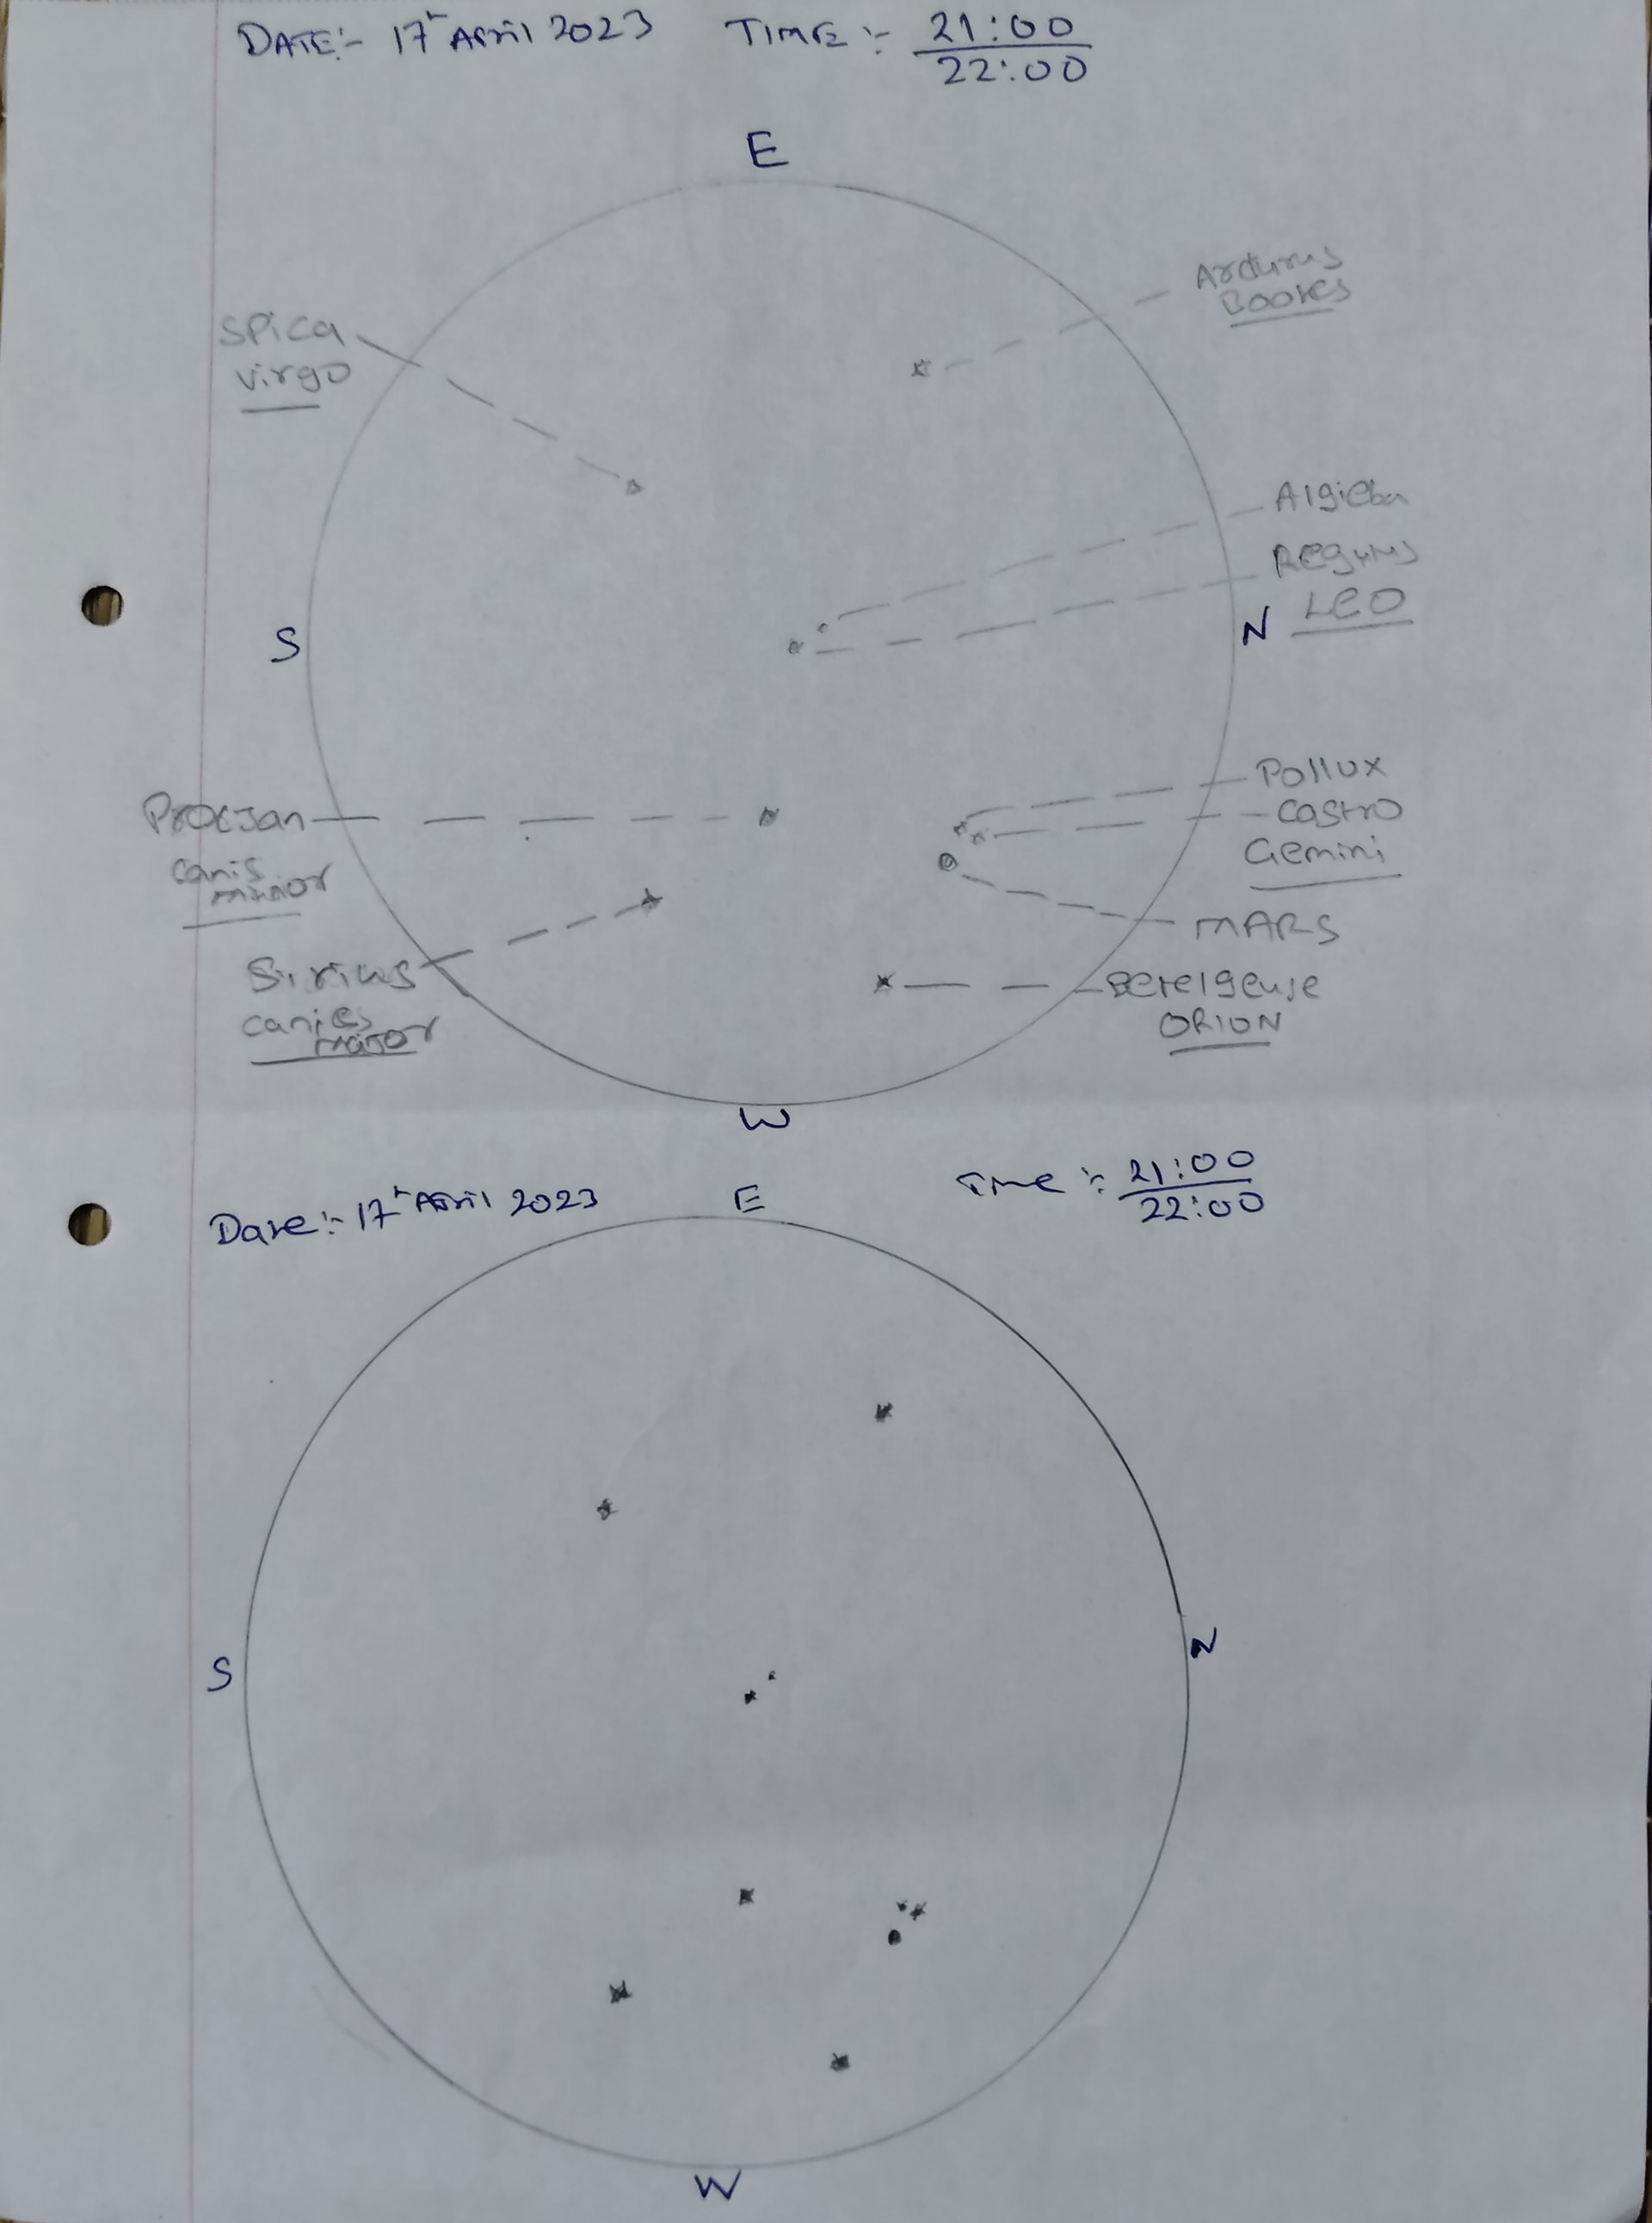
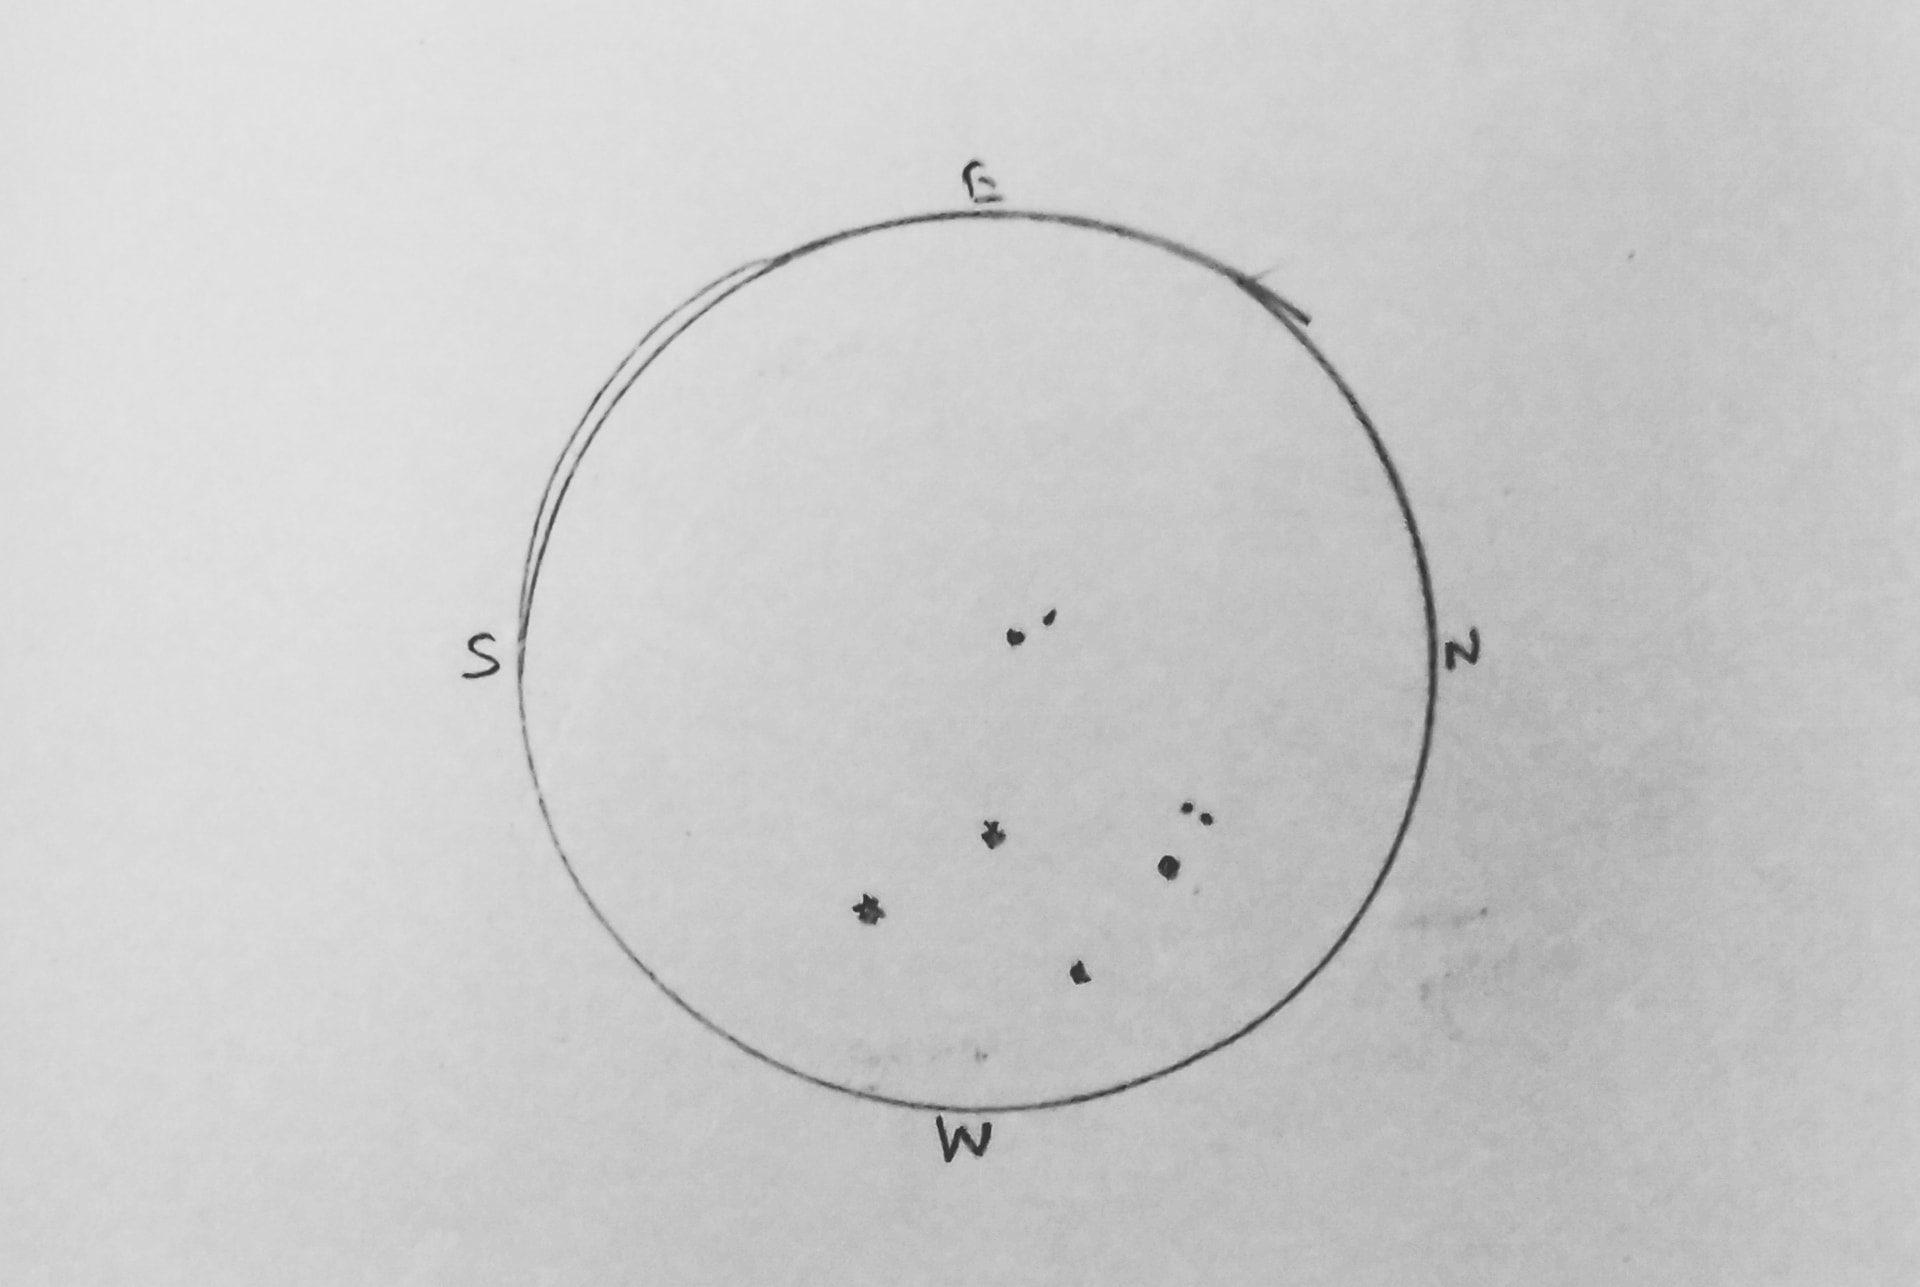
Tip: As a beginner I use to make two versions of each sketch, one with the star names and one without. See the attached initial sketch of mine.
Putting It into Practice: Sketching the Evening Sky
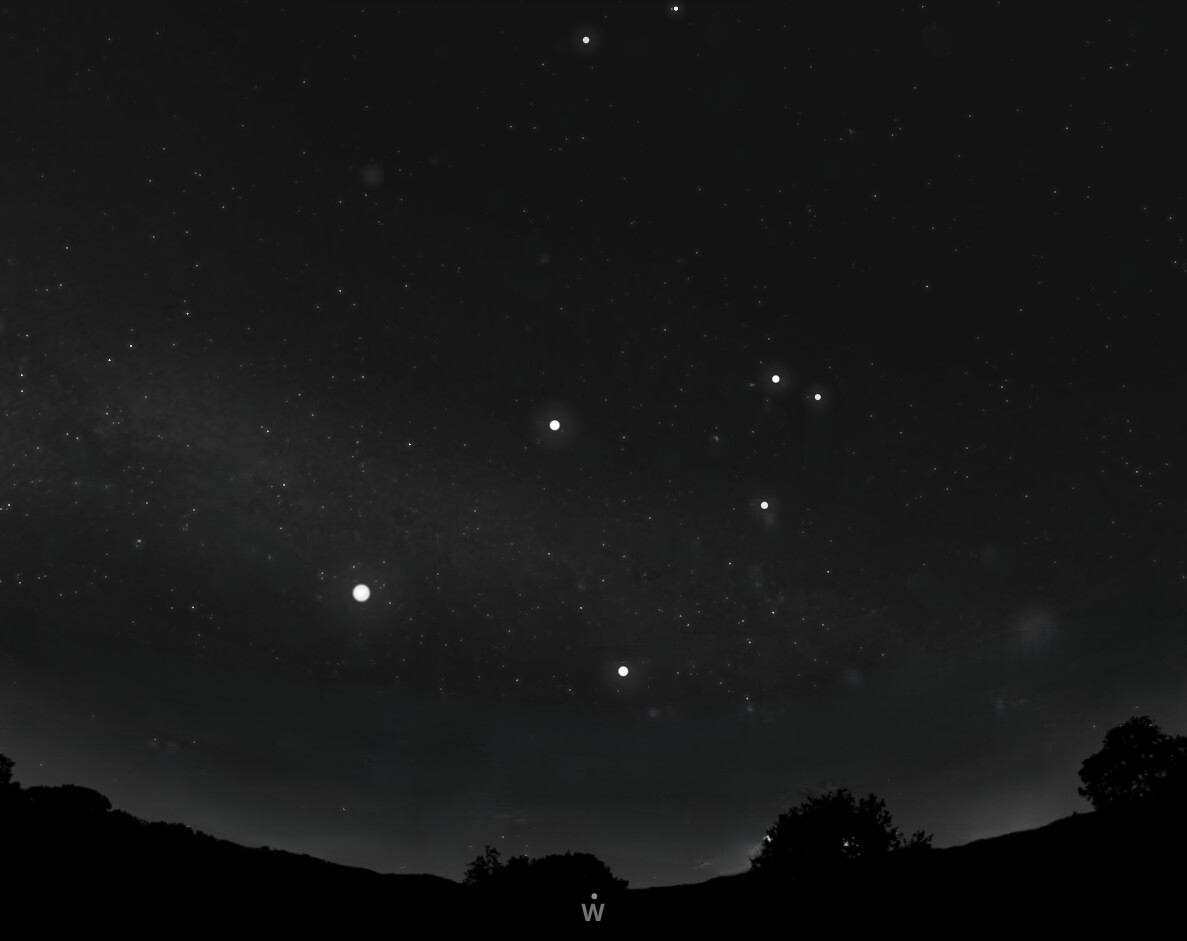
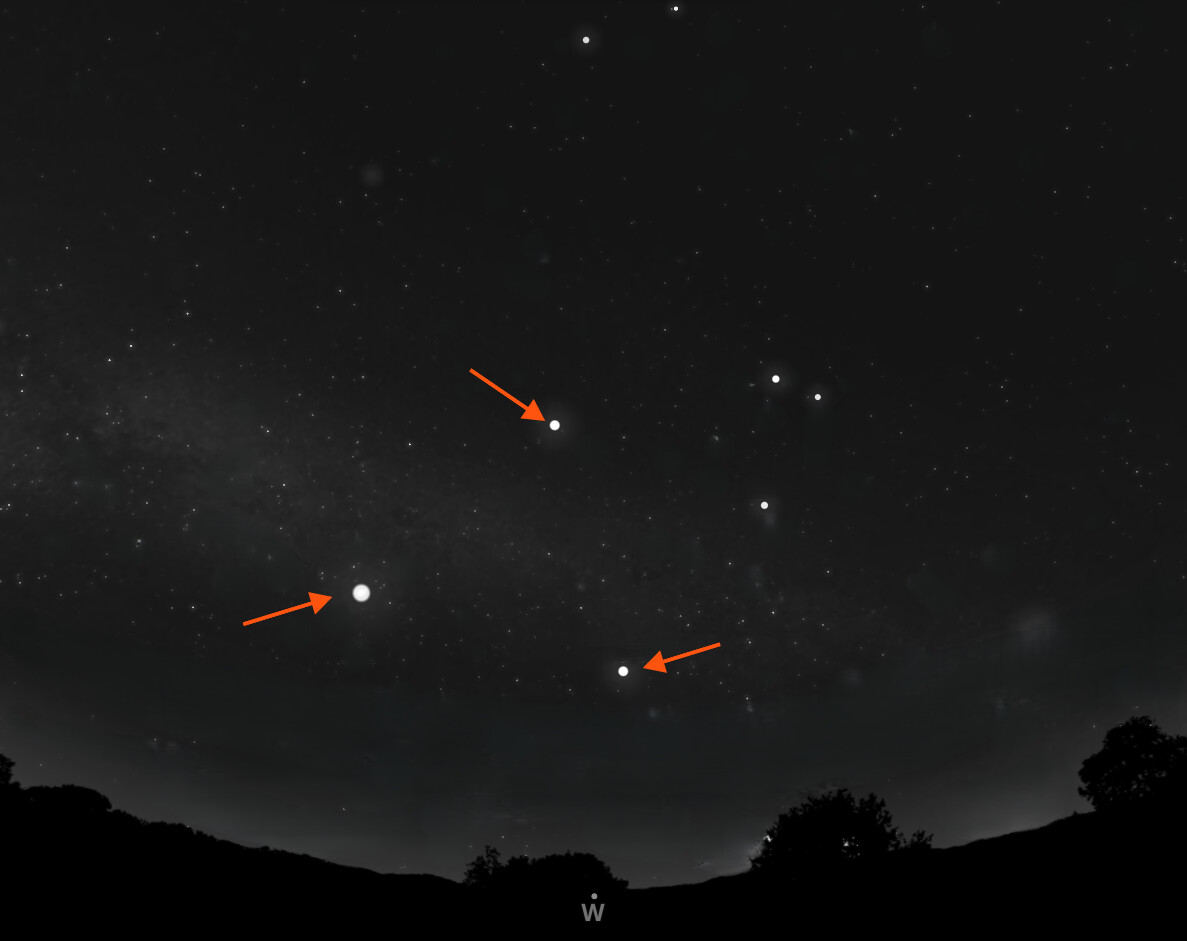
For the demonstration I am using the sky map from the Stellarium app for 17 April 2023, 21:00, Chennai, looking west, because I made the above sketch on that night at that time. The W marker sits at the bottom of the map, exactly as it would at the bottom of your circle.
Here is how the six steps apply to this view.
-
Prepare the paper. Draw the circle, write W at the bottom, then N on the right, E at the top and S on the left. Add the date, time and location at the top.
-
Choose the target. Don’t try to draw every star. Pick the handful of bright stars that stand out from the faint background.
-
Observe before you draw. Spend a few minutes with the view first. Notice:
- the brightest star, Sirius, is low on the left
- Castor and Pollux sit close together on the upper right, with the planet Mars just below them
- Procyon, Betelgeuse, Regulus, and Algieba fill in the rest of the field
- a faint, hazy band of the Milky Way glows along the left side
- the horizon and trees are at the bottom
-
Plot the brightest stars first. First Lets plot the three bright objects.
Place the largest dot for the brightest star, then slightly smaller dots for the others.
Keep the distances between them in proportion, then compare your drawing with the map and adjust.
-
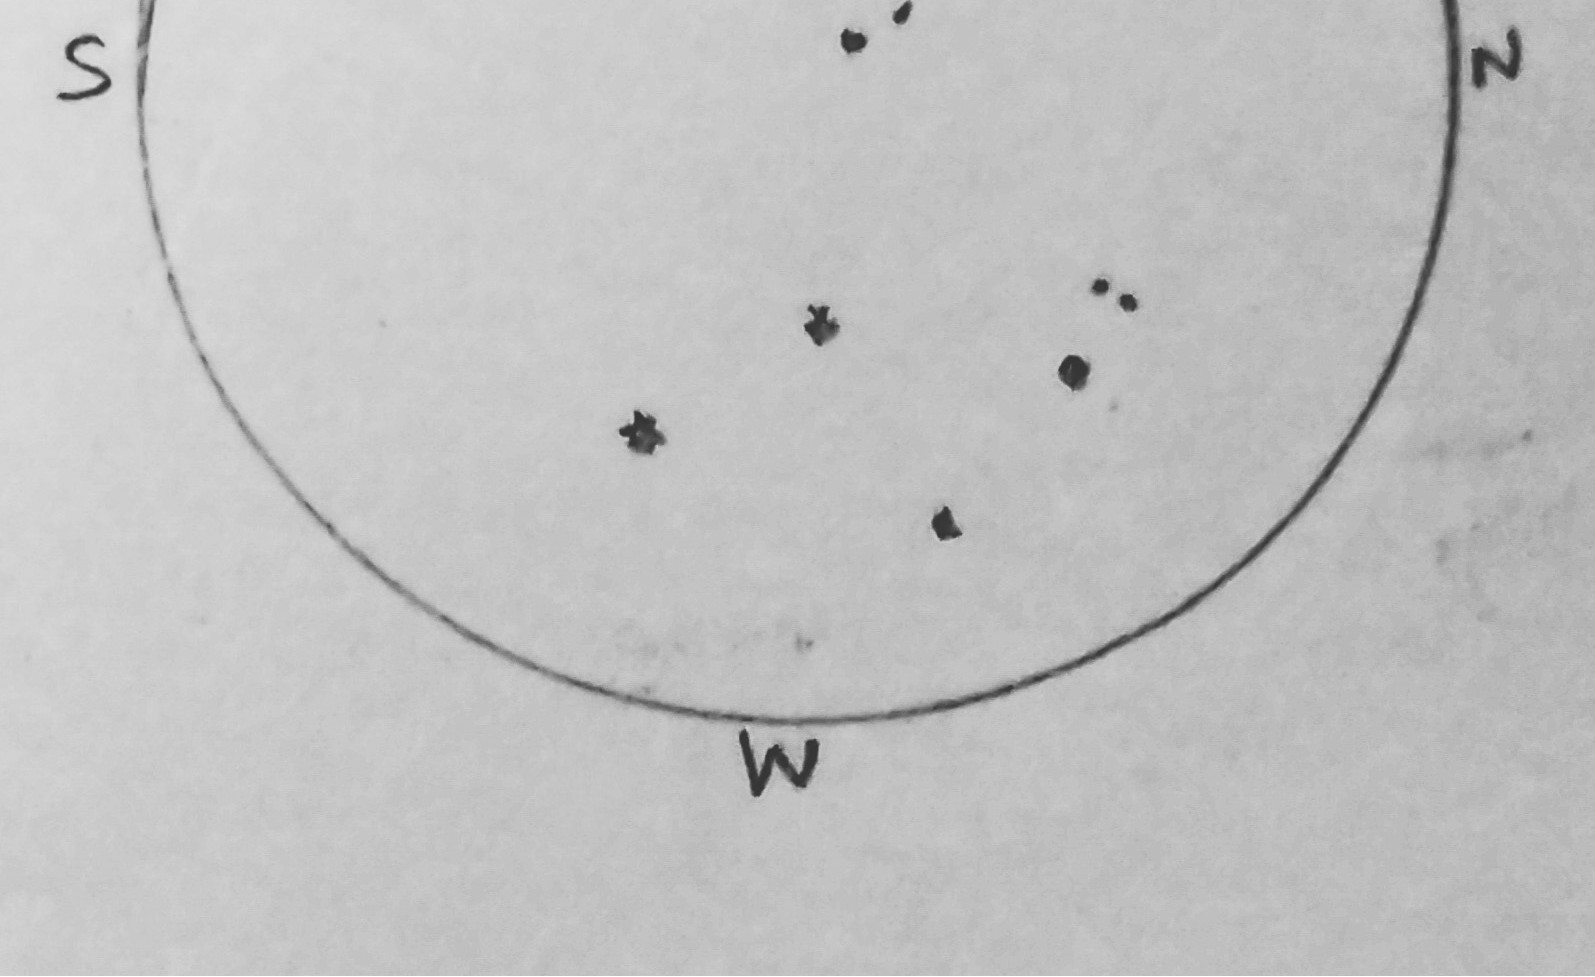
Add observation notes. Write the star names beside the dots, for example: Sirius, Procyon, Betelgeuse, Castor, Pollux, Regulus, and Algieba, with Mars marked as a planet. (I make two versions of each sketch, one with the star names and one without. See the attached initial sketches of mine.)
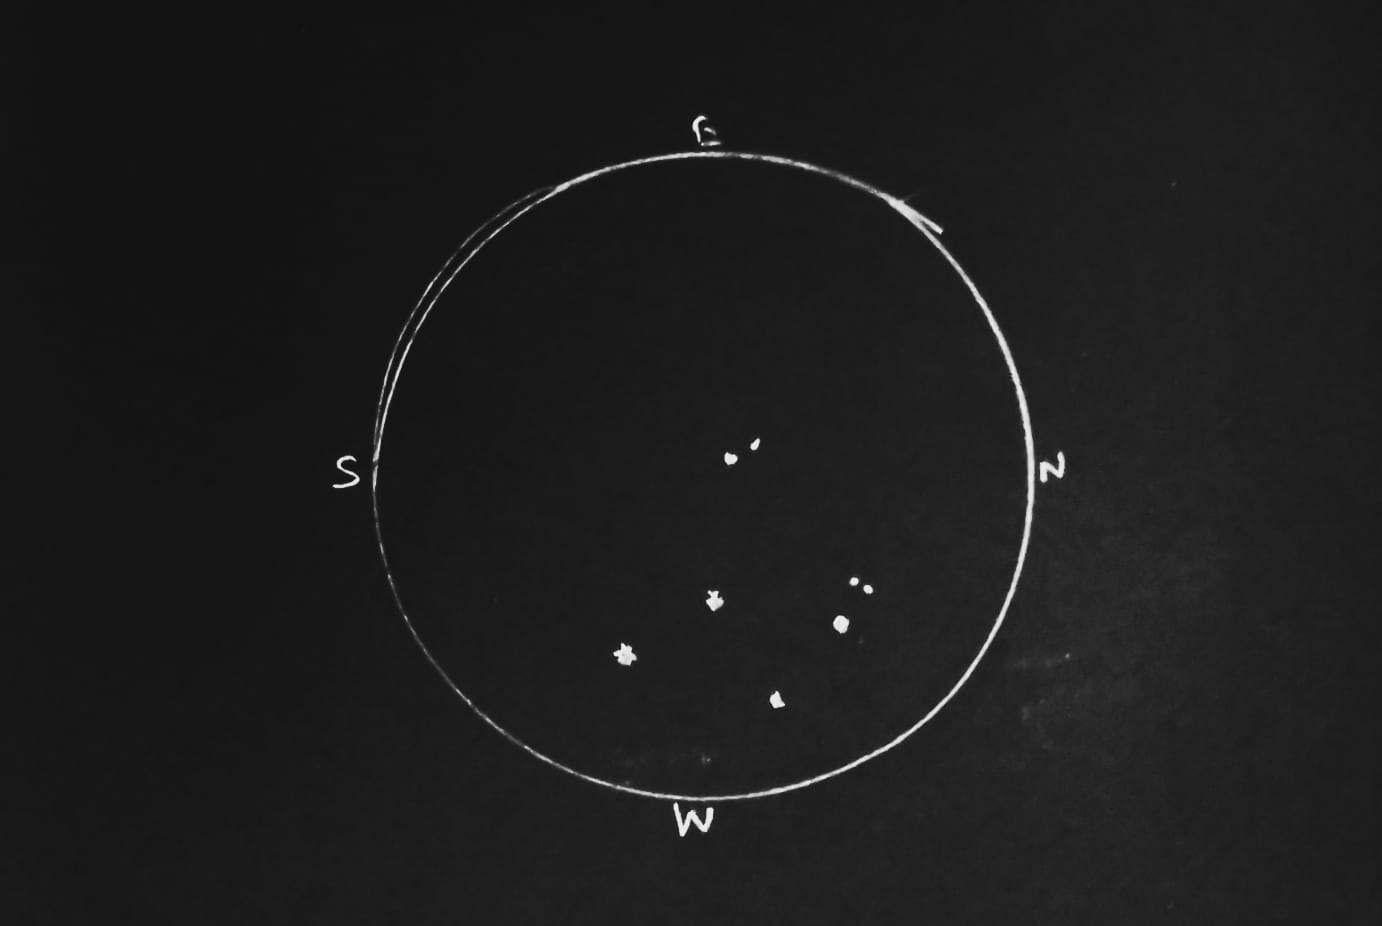
Optional: invert.Photograph the finished sketch and invert it to get a dark sky with white stars
Step 6 (Optional): Invert Your Sketch
Once your sketch is finished, you can use a free image-editing app to turn it into a classic astronomical illustration: a dark sky with bright stars standing out against it. You do not need expensive software or advanced editing skills. A smartphone and a free app are enough.
- Photograph your sketch.
- Open a free image-editing app, such as Snapseed, Adobe Express or GIMP.
- Invert the image. Inverting reverses the tones, so white paper becomes black and dark pencil marks become white or light grey. See the Snapseed screenshot below.
- Fine-tune the image. After inverting, make small adjustments to brightness and contrast.
- Save your finished sketch.
Turn a pencil sketch on white paper into a white-on-black image in ten steps, using the free Snapseed app.
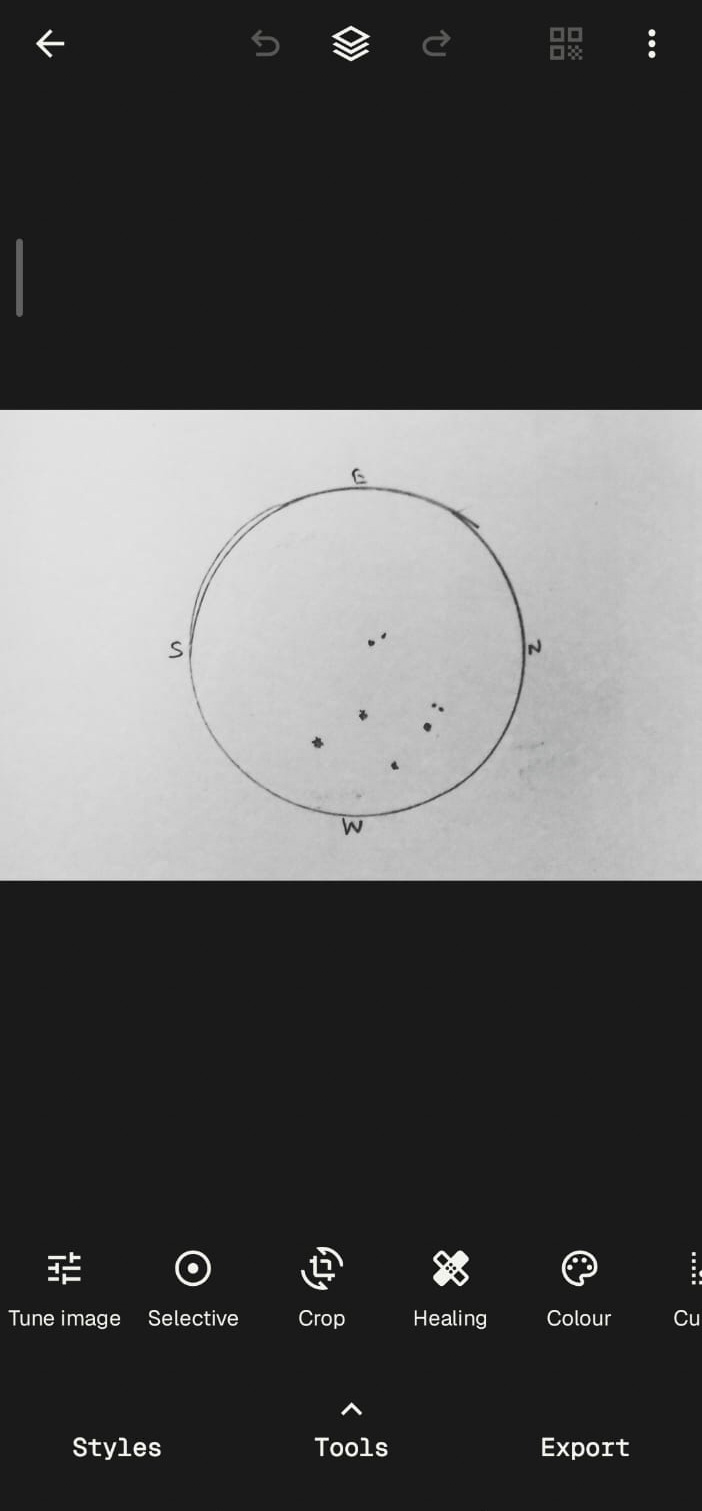
Step 1: Open the image in Snapseed
Open the Snapseed app and load the photo of your sketch.
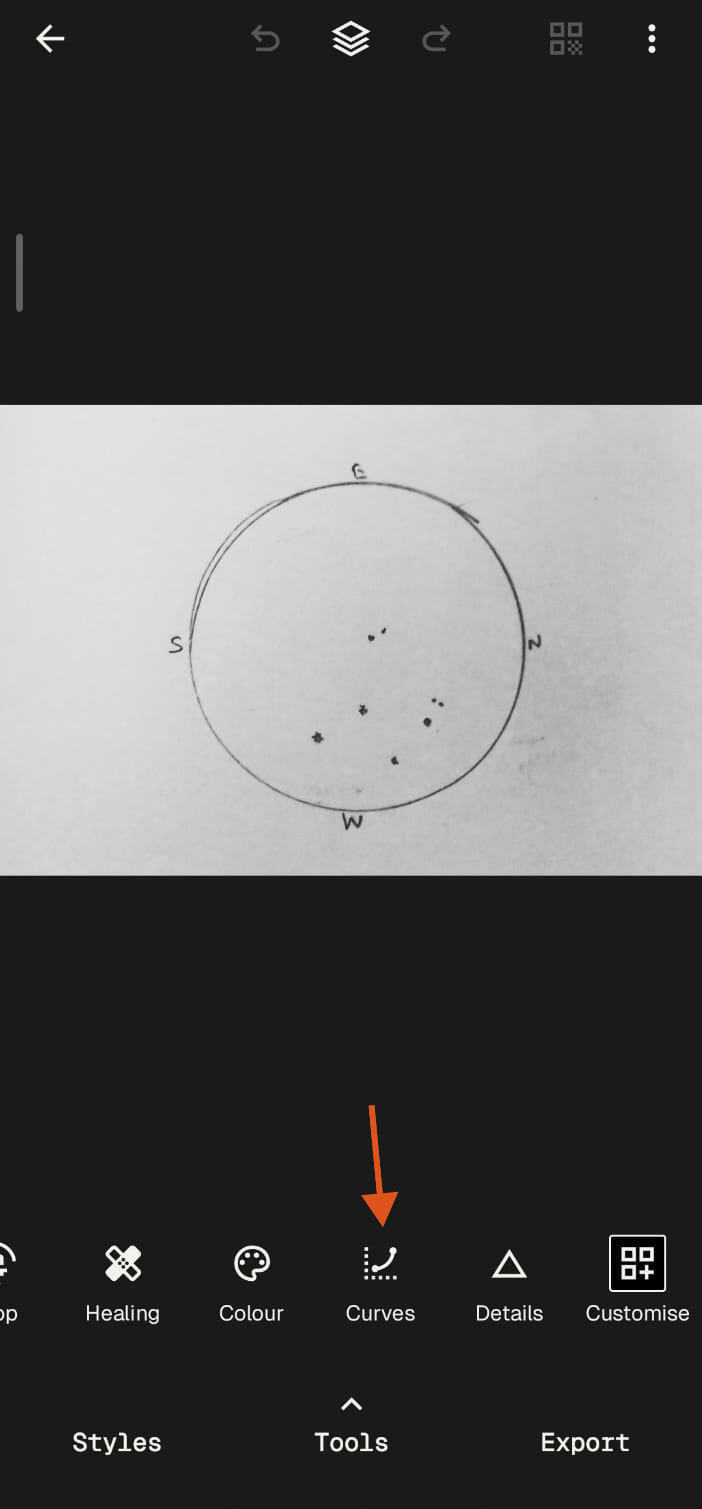
Step 2: Open the Curves tool
Tap Tools, then tap Curves to adjust the tone curve.
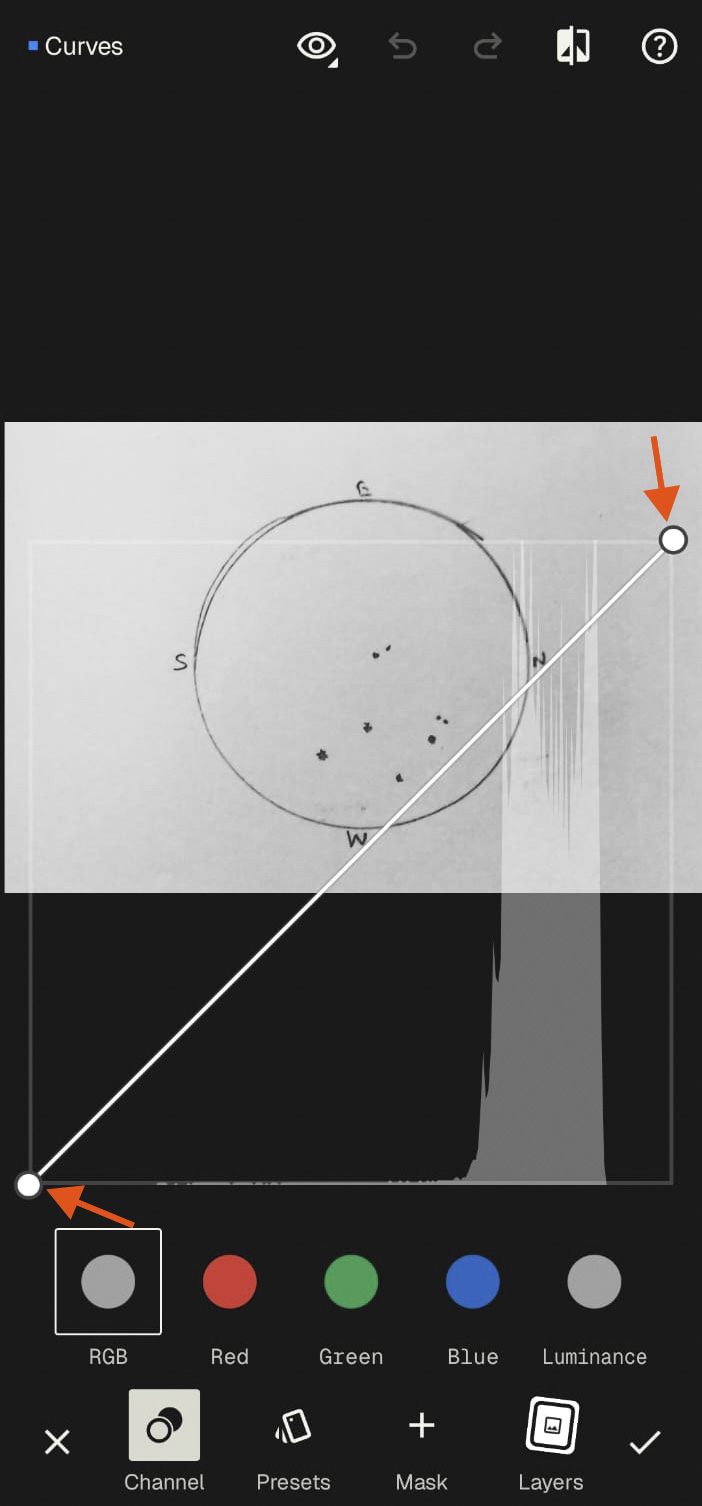
Step 3: Invert the curve
The curve starts as a straight line from the bottom left to the top right. Drag the bottom-left point to the top, and the top-right point to the bottom.
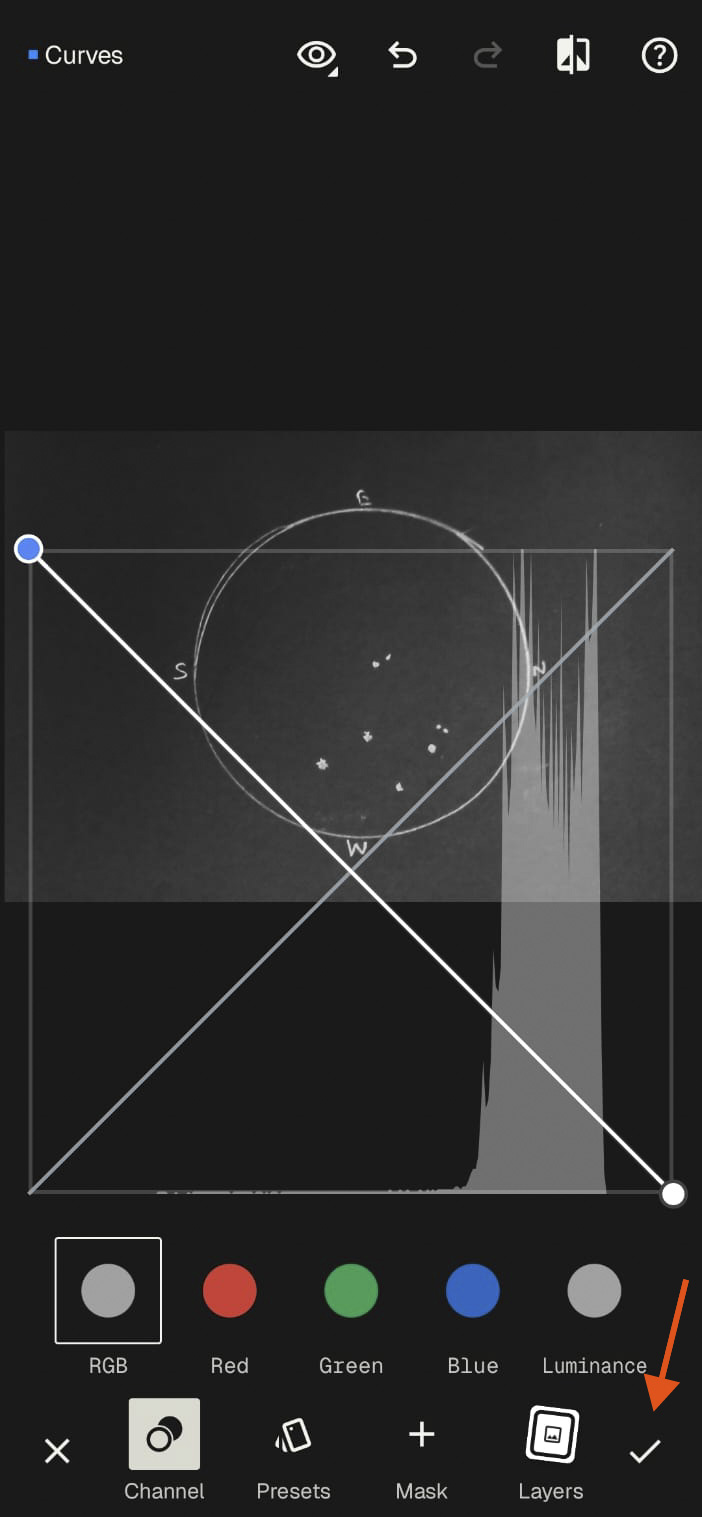
Step 4: Confirm the inverted curve
When the line runs from the top left to the bottom right, the paper turns black and the pencil marks turn white. Tap the tick at the bottom right to confirm.
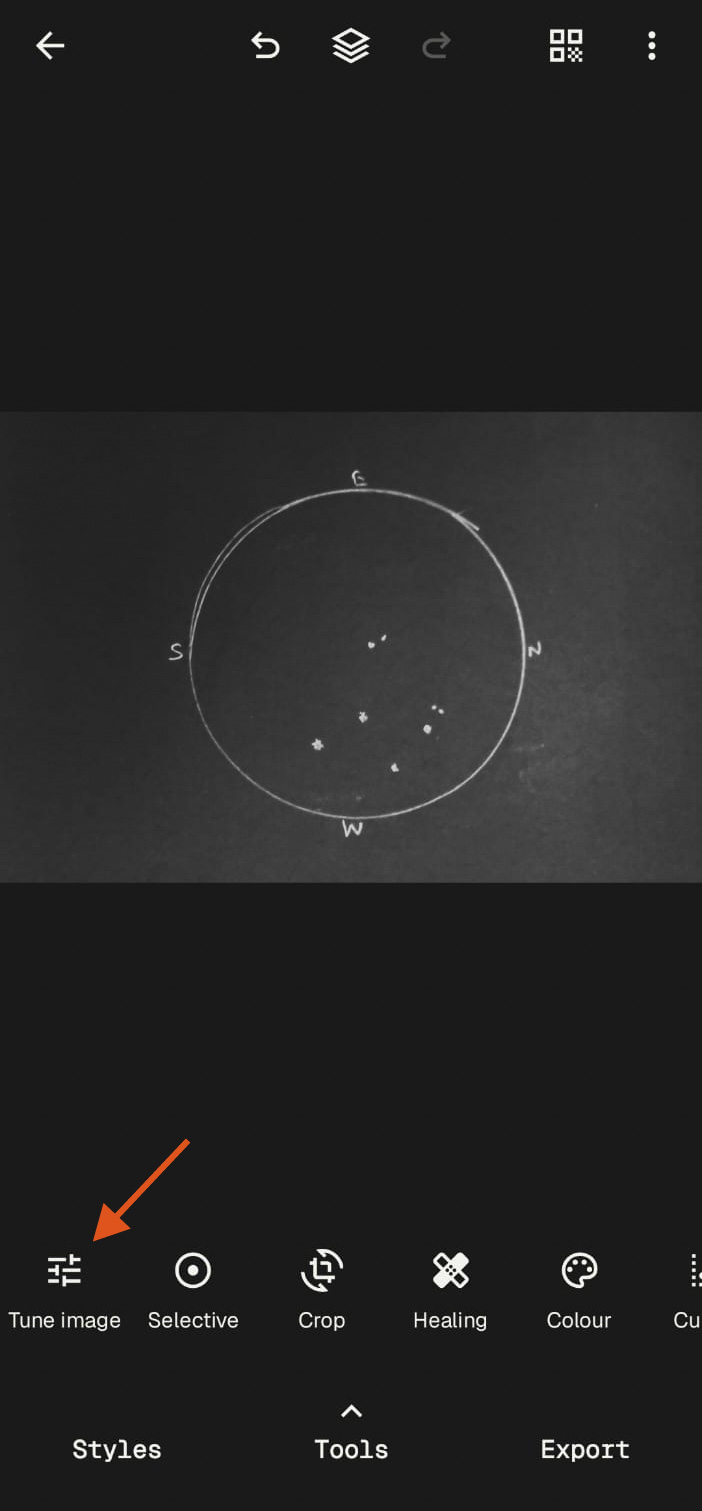
Step 5: Open Tune Image
To fine-tune the result, tap Tools again, then tap Tune Image.
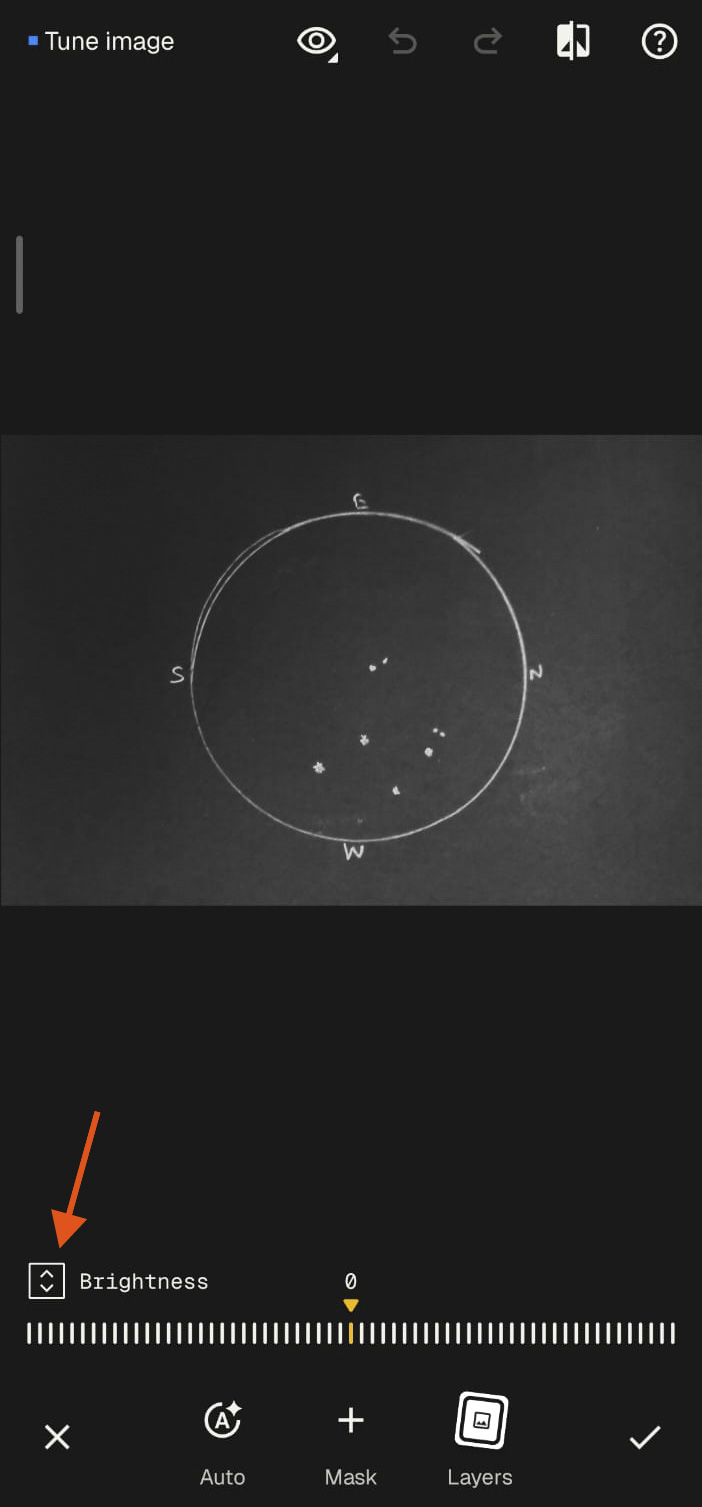
Step 6: Show the adjustment options
Tap the icon at the bottom left, next to the slider label, to open the list of adjustment options.
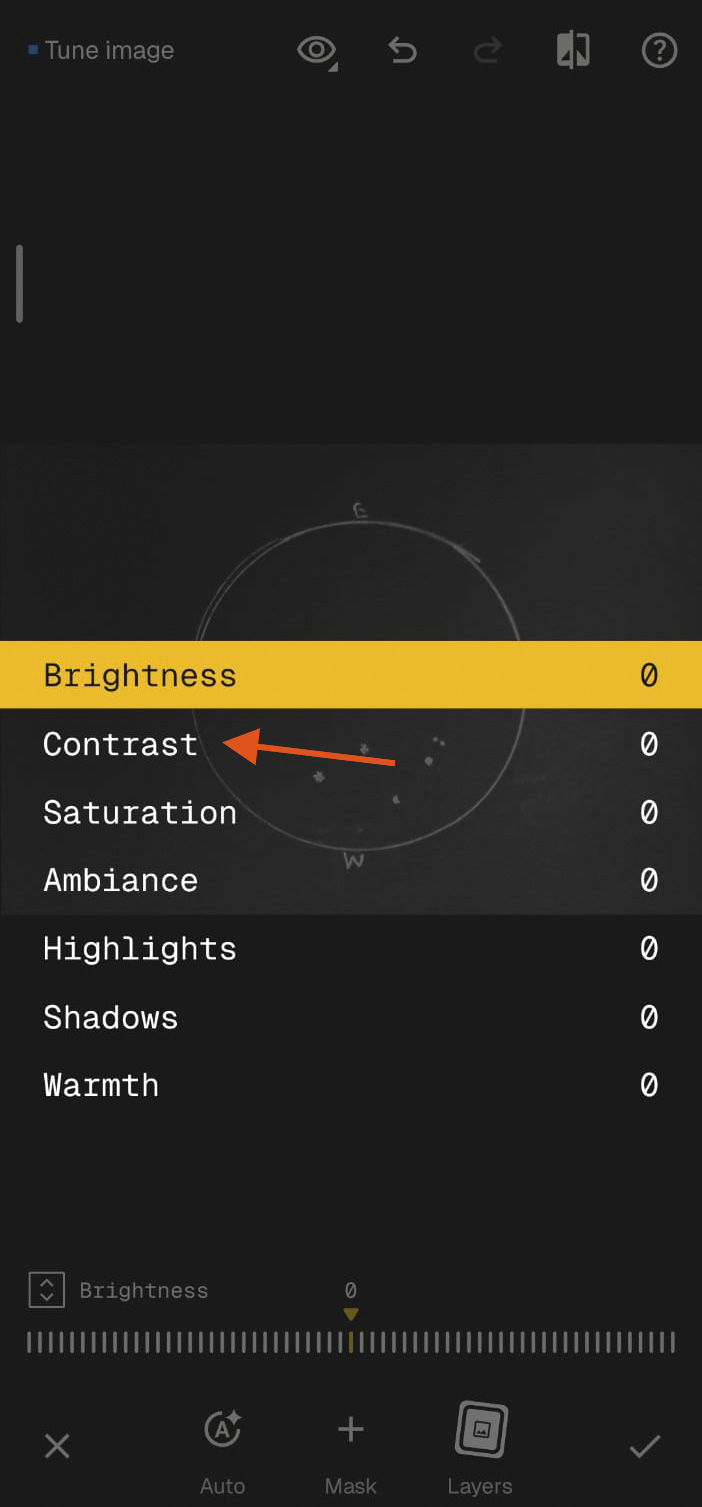
Step 7: Select Contrast
Choose Contrast from the list.
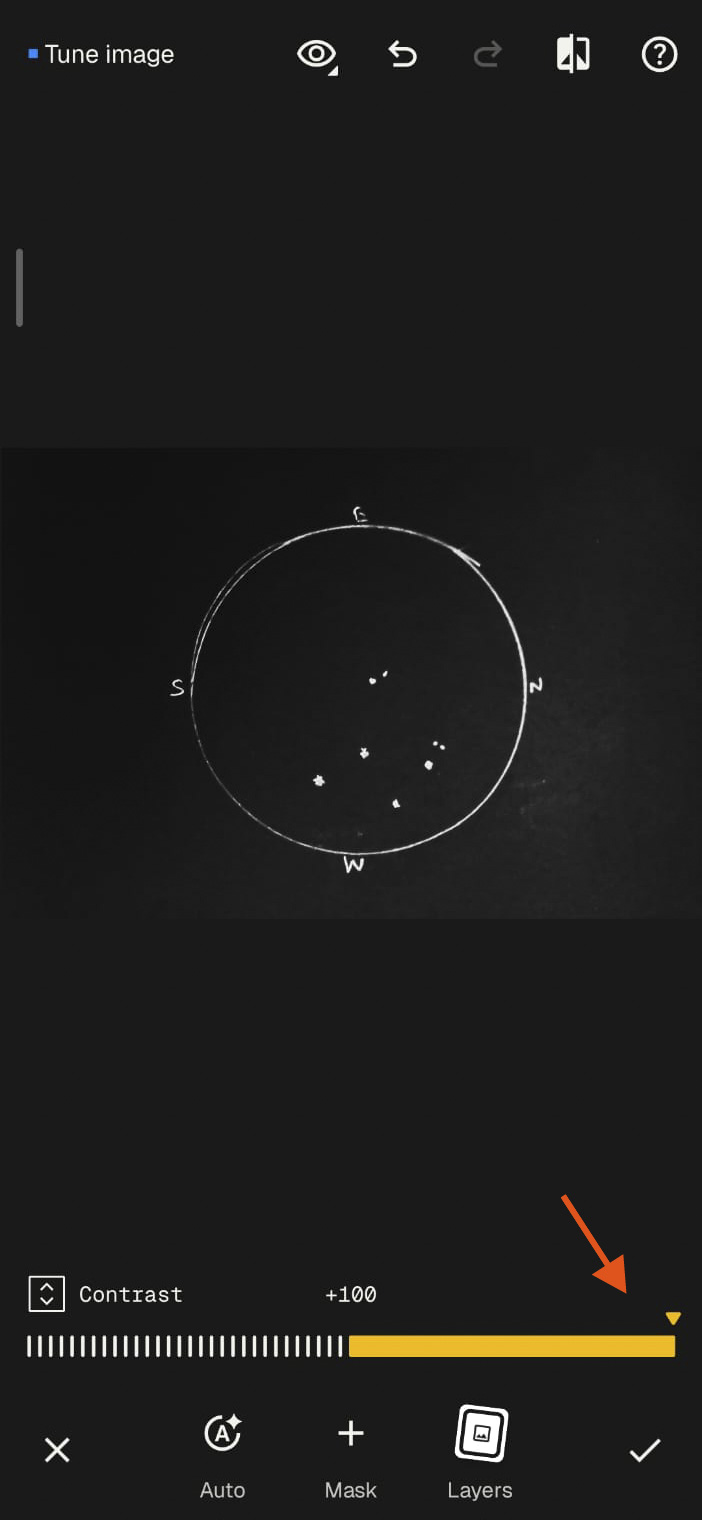
Step 8: Adjust the contrast
Slide to the right to increase the contrast until the stars and lines stand out, then tap the tick to apply it. In my example I set the contrast to +100.
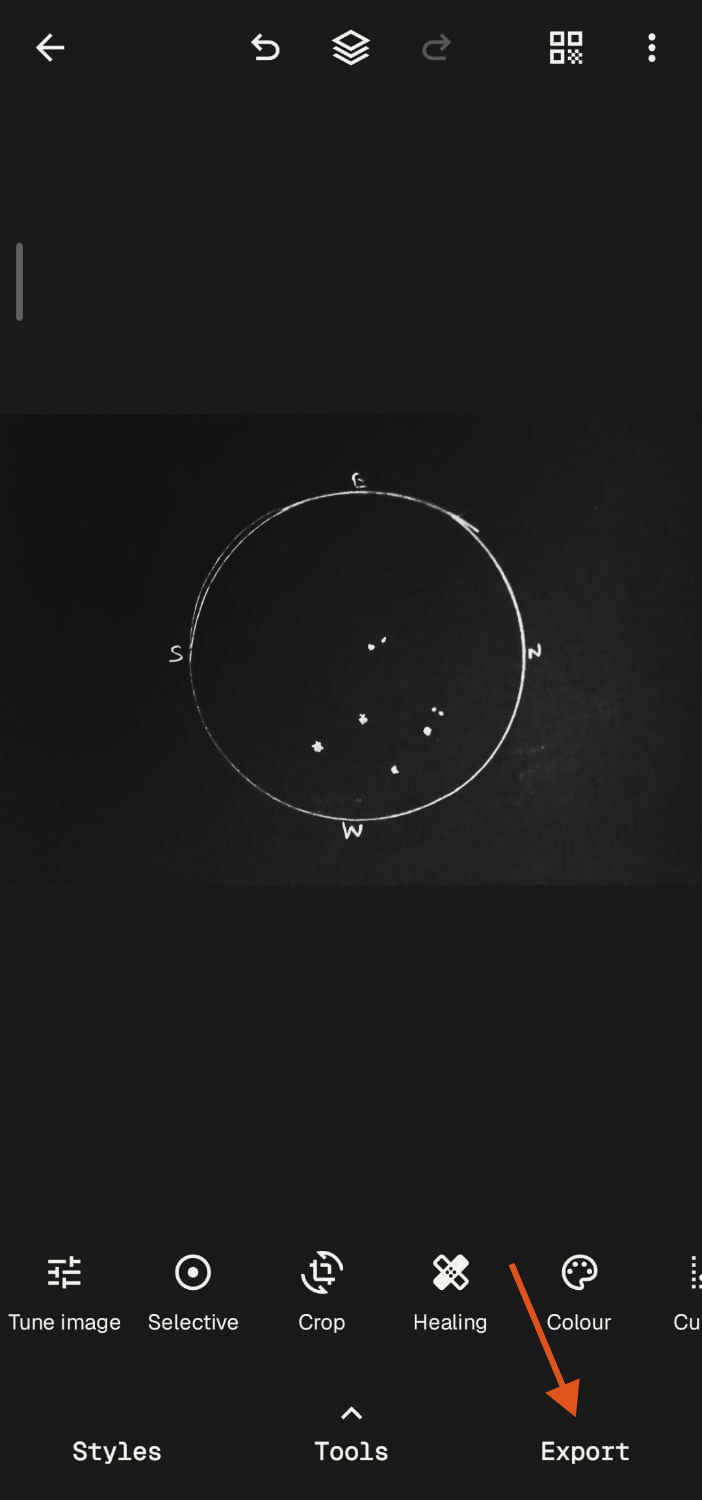
Step 9: Export the final image
Tap Export at the bottom right.
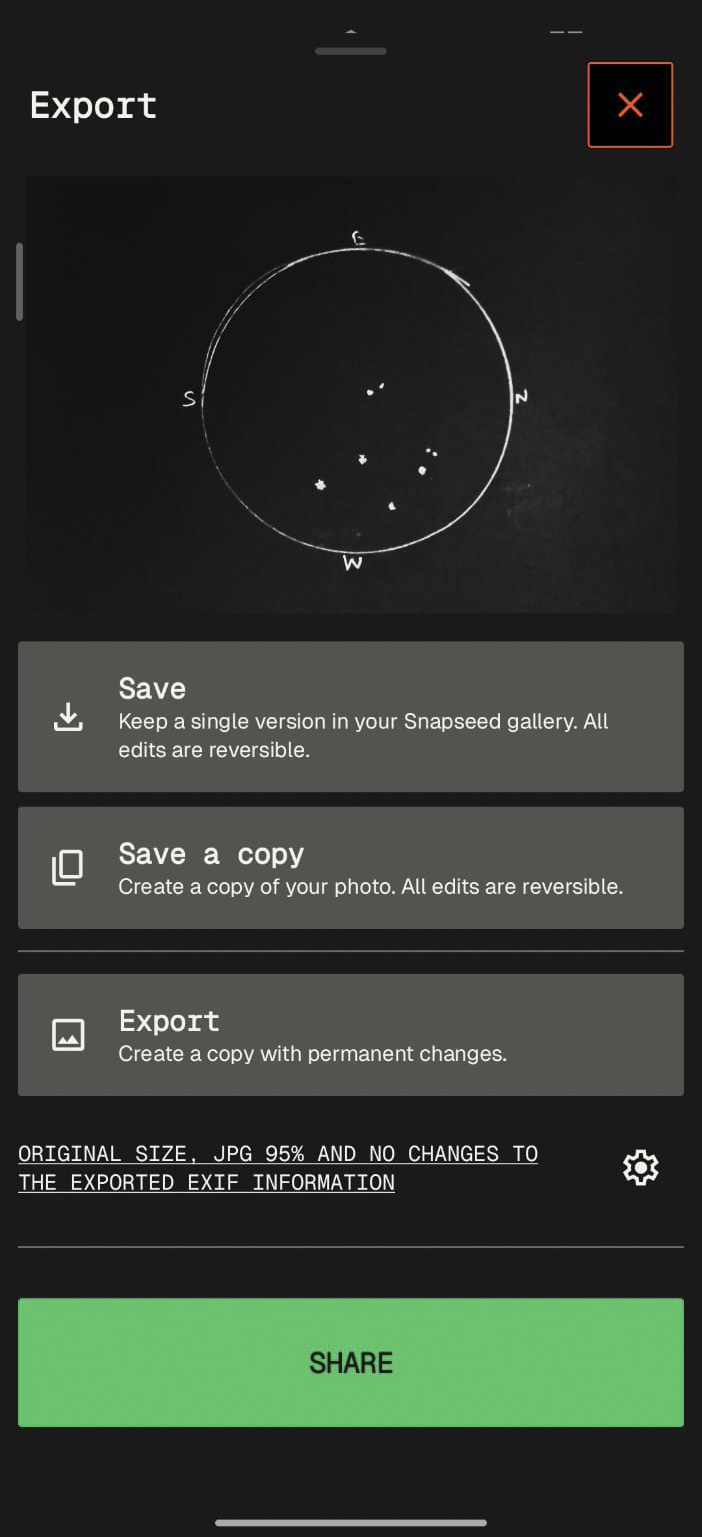
Step 10: Save or share the final image
Choose how to keep it: Save keeps one version in your Snapseed gallery, Save a copy makes a copy, and Export creates a copy with permanent changes. Tap Share to send it on.
Here is our Final Sketch
Bonus: Sketch with Your Smartphone
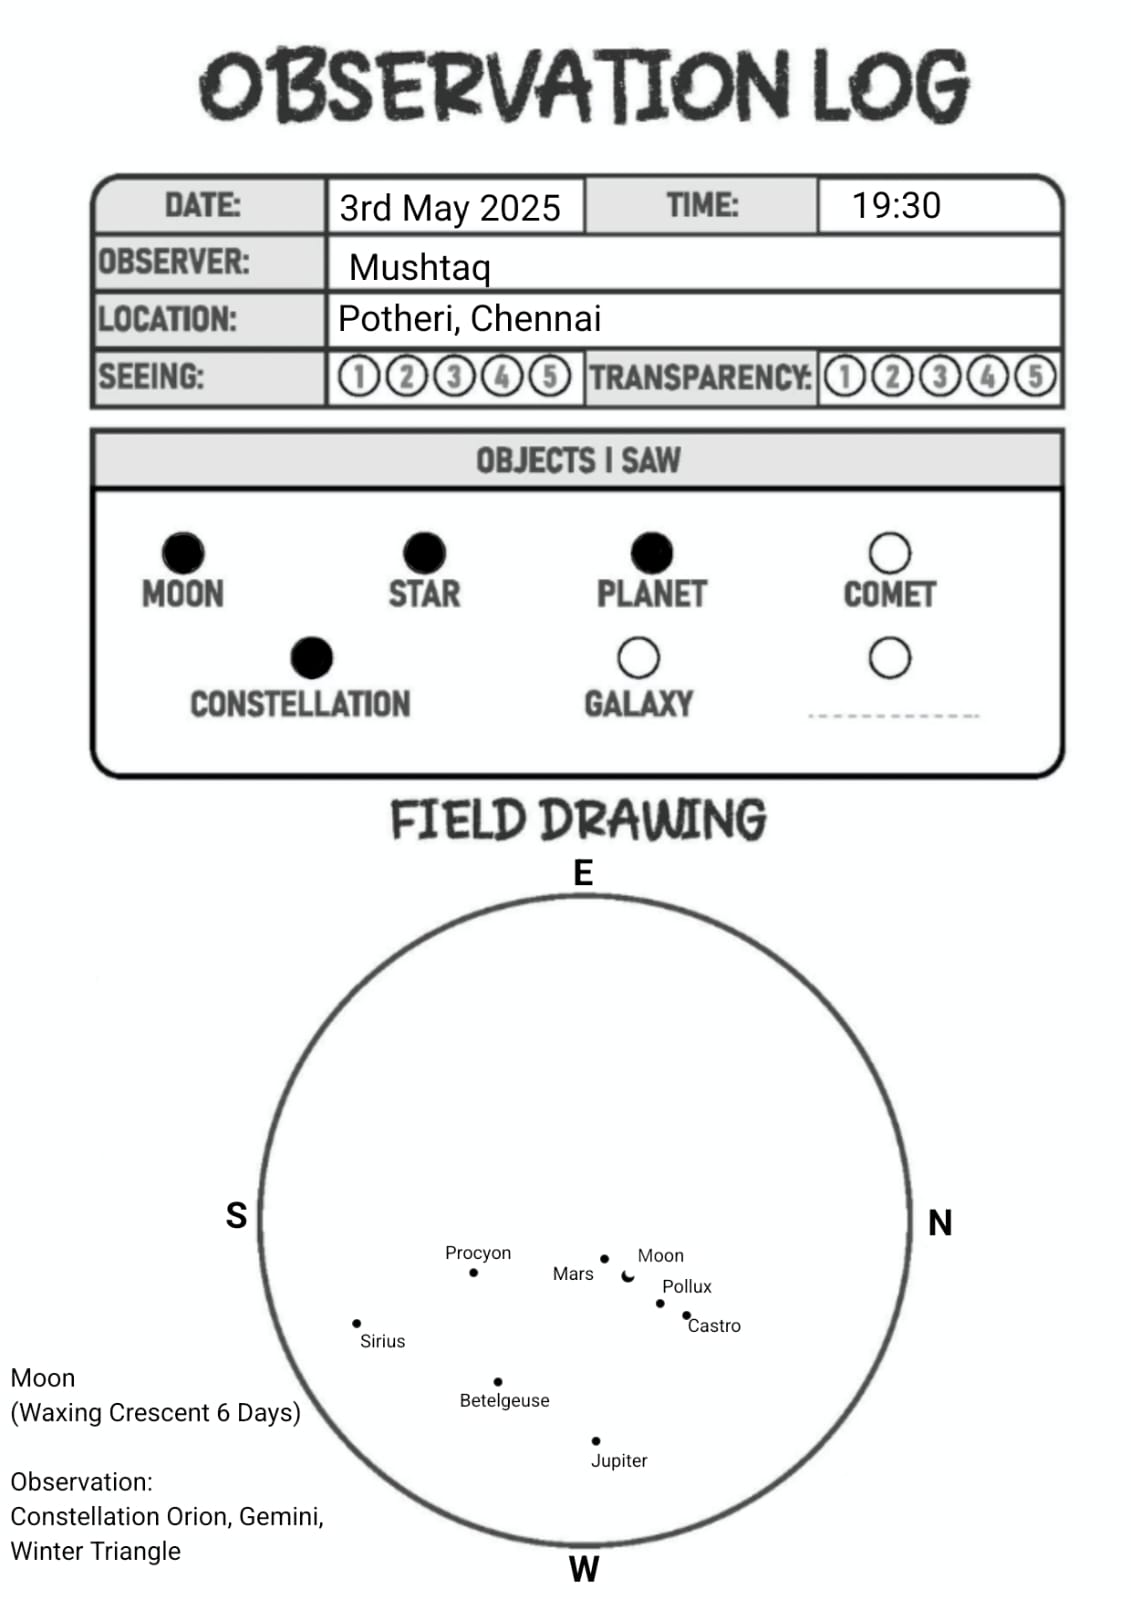
You can also do your naked-eye sketching with just your smartphone and a free sketching app. I made the sketch below on my phone while waiting for a train at a railway station.
I loaded an observation sheet as the background image in my sketching app, so I could fill in the date, time, location and notes just as I would on paper, then draw the stars directly in the field circle.
Thanks for reading!
Coming Up Next
In Part 3 we will sketch the Pleiades, an open cluster, using binoculars or a telescope, and practise placing many stars accurately.