Hello everyone! This is my attempt at a guide to astronomy sketching, a skill I am still learning myself and I am happy to share what I have picked up so far.
I am splitting the guide into a series of posts, because covering everything in one post would be too much for a beginner. Here is the plan:
- Part 1, Introduction to Sketching (this post): why sketch, the challenges and how to overcome them, and the tools you need.
- Part 2, Your First Sketch: naked-eye sketching with just a pencil, paper and a clear night sky.
- Part 3, The Pleiades: sketching an open cluster with binoculars or a telescope, and practising how to place many stars accurately.
- Part 4, The Moon: sketching one phase of the Moon (other than full) and a close-up of a crater. I will also introduce the white-on-black method.
- Part 5, Saturn: sketching a planet.
- Part 6, The Orion Nebula (M42): sketching a deep-sky object.
Let’s begin the journey.
Part 1: Introduction to Sketching
Why Sketch the Night Sky?
Sketching is one of the most effective observing tools available to a visual astronomer. It shows you what you can see, and it teaches you to see far more than a quick glance through an eyepiece.
- It slows you down. A 30-minute sketch of one object gives you a much deeper experience than a quick tour of ten objects.
- It builds a personal record. Each sketch is a dated, signed record of what you saw on that night, under that sky.
- It is relaxing and mindful. Sitting quietly under the stars with a pencil is calm, focused time.
A Brief History of Astronomical Sketching
Sketching is one of the oldest ways humans have observed, recorded and understood the night sky. Long before photography, astronomers used drawings to document celestial objects, map the sky and share their discoveries.
I will not go into the sketches of ancient civilisations here. If you are curious, there is plenty to find online. Instead, here is Galileo’s famous sketch of the phases of the Moon.
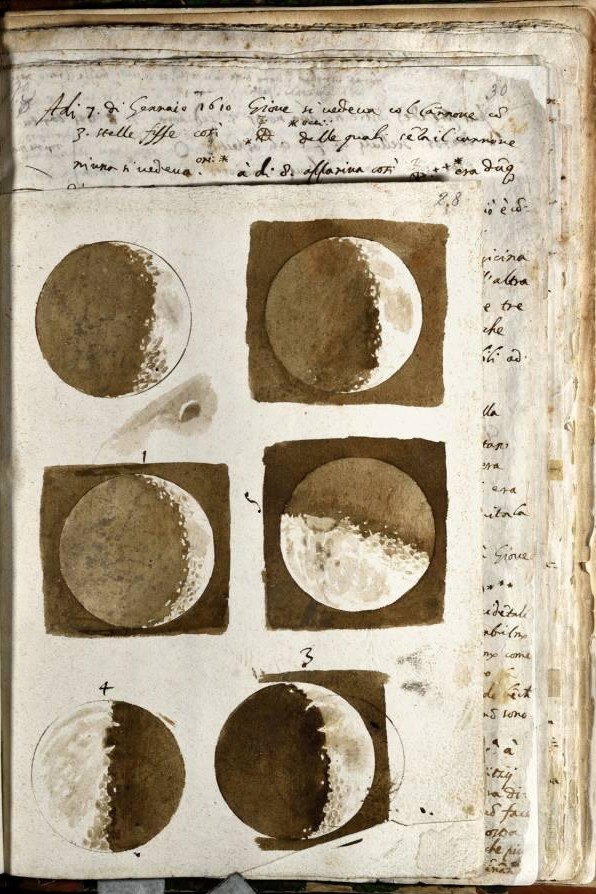
Image Credit: World Digital Library
Challenges of Eyepiece Sketching and How to Overcome Them
These are the main challenges I faced as a beginner.
Challenge 1: “I can’t draw”
Problem: Fear of drawing stops many people from starting.
Solution: Astronomy sketching is not art; it is observation. Dots, shading and simple shapes are enough. Believe me, your skill grows quickly with practice.
Challenge 2: Getting positions and proportions right
Problem: Stars end up in the wrong places, or the sketch looks distorted.
Solutions:
- Imagine the field divided into quadrants or a clock face.
- Start with the brightest stars as anchors and build the pattern around them.
- Start from the outside and move inward.
- Judge positions using lines, angles and distances relative to other stars, for example “halfway between Star A and Star B.”
- Check the sketch at the eyepiece, then step back and compare. Correct errors straight away.
Challenge 3: The object drifts out of view
Problem: Earth’s rotation moves objects across the field, especially at high power.
Solutions:
- Place the object on the side of the field where it enters, so it drifts across the centre while you sketch.
- Follow the 80/20 rule: spend about 80% of your time observing and 20% sketching.
- Re-centre the object between drawing stages.
- A tracking mount helps a great deal, but it is not required.
Challenge 4: Sketching in the city
Problem: Light pollution. Street lights, buildings brighten the background, wash out faint stars and nebulae, and spoil your dark adaptation.
Solutions:
- Choose targets that cope with light pollution. The Moon, planets, bright star clusters like the Pleiades, double stars, and bright nebulae like M42 all work well from a city. Leave faint galaxies for darker skies.
- Block direct light. Stand behind a wall light shines into your eyes or the telescope. A dark cloth or hood over your head also helps.
- Observe objects when they are high in the sky. Observe late at night, when many lights switch off and the sky is a little darker.
- Keep your expectations realistic. Your sketch is an honest record of what you saw from your own sky.
In the coming parts we will look at how to tackle these challenges, and others, in more detail.
Essential Tools for Astronomical Sketching
You do not need expensive art supplies or advanced astronomical equipment to begin. Start simple and add items as you discover what you like.
I bought my first binoculars only after two years of sketching with the naked eye. I started with a notebook, a pencil, an eraser and a sharpener.
Sketching tools
To start with, you need:
- Plain paper or a sketching template.
- An HB pencil. Ideal for outlines, star positions and general detail.
- A 2B pencil. The softer graphite makes it easier to shade lunar surfaces, planetary features and the brighter areas of deep-sky objects.
- An eraser. A soft eraser corrects mistakes, and a kneaded eraser can gently lift graphite to create highlights.
- A pencil sharpener.
- A firm drawing board.
Add these as you go:
- A sketchbook
- Black or dark paper
- Soft charcoal pencil
- White charcoal & pastel, White pencil or pen
- Blending stump or cotton bud
- Red torch
Observing equipment
To start with, you need:
- The naked eye. An excellent starting point for learning constellations, mapping star patterns and sketching large asterisms.
- Binoculars. They give a wider view of the sky and are particularly useful for open star clusters, the Moon and bright nebulae.
Add these as you go:
- A telescope on a stable alt-azimuth (AZ) mount .It reveals lunar craters, planetary detail, double stars, globular clusters and faint deep-sky objects.
- Eyepieces. Different eyepieces give different magnifications and fields of view. Choose one that makes the object comfortable to observe.
- A tracking mount (Optional). Many experienced sketchers use one, but you can do great sketching without it.
Note: You can begin astronomical sketching with your naked eyes or binoculars. A telescope is useful, but it is not a requirement for learning to observe night sky.
Why Astronomical Sketching Still Matters
Even in the age of advanced cameras, sketching encourages you to slow down and truly observe. It trains your eye to notice faint detail, helps you understand the structure of celestial objects, and lets you appreciate what you can actually see with your own eyes and telescope.
Remember: the goal of astronomical sketching is NOT to create a perfect picture, but to record an honest impression of what you observe.
Coming Up Next
In Part 2 we will do our first sketch: a naked-eye sketch that needs nothing more than a clear sky, a pencil and paper.